


30D HT Silnylon 46g/m²
3D Mesh 194g/m²
50D 69g/㎡
Size L 378g (Without Accessories)
Size L 28-38L
Hip Belt
Reflectable Bungee Cord
Repair Tape
- Introduction
- An Ultralight Backpack for Minimalist Overnight Hikes
- Product Story
- New Buddy for Hiking
- Product Story 2
- Designing with Depth
- Form and Function
- Designed for Comfortable Hiking
- High Capacity Mesh Pocket
- Highly Versatile
- Anatomy of the MINI2
- Integrated Minimalist Pad
- How to Carry
- Options
- Packing Tips
- Material
- Pertex®︎07RS-PC
- ECOPAK EPX200
- Size guide
- Notes before use
- Fabric Water Resistance
- DEET
- Instructions
- Care Instructions
- Repair
Introduction
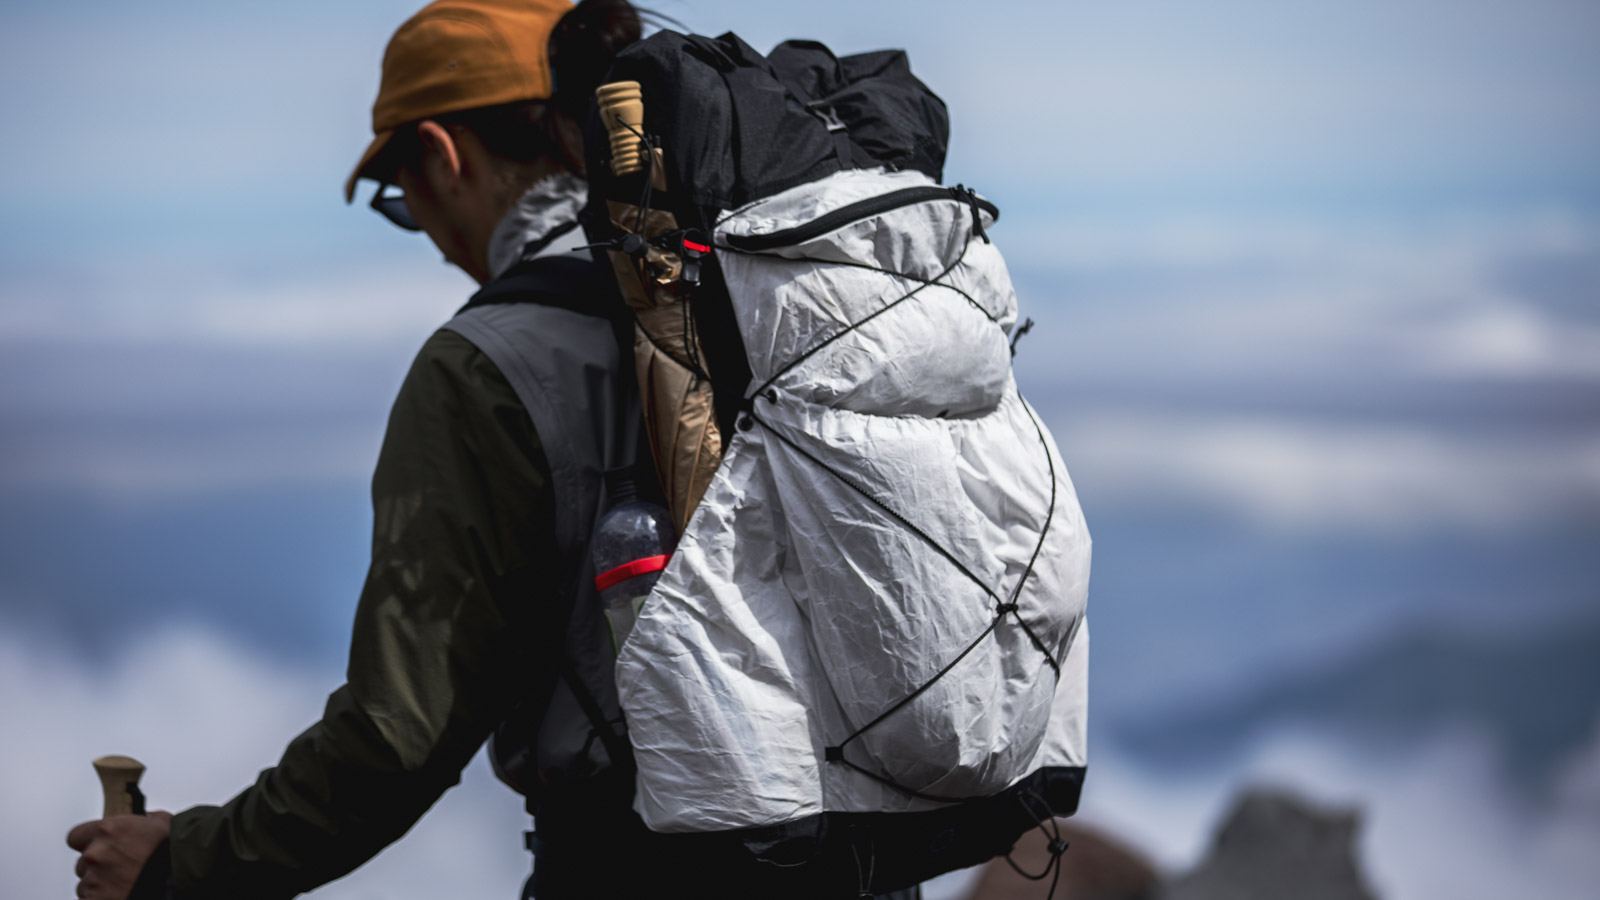
An Ultralight Backpack for Minimalist Overnight Hikes
The front and side pockets of the MINI have been redesigned with large mesh pockets, reminiscent of early-2000s ultralight backpacks—making it a true ultralight hiking pack.
The main body is made from an original, lightweight yet soft 70-denier fabric* developed in collaboration with Pertex. For the base, where durability, water resistance, and stain resistance are essential, fully waterproof ECOPAK is used.
Weighing just 360g (Size M)—30g lighter than the previous MINI2—this is the purest ultralight backpack in the Yamatomichi lineup. Despite its minimal weight, it comfortably carries gear for 1 to 2-night ultralight hikes.
*For more details about the fabric co-developed with Pertex, please see our NEWS article.
Product Story
New Buddy for Hiking
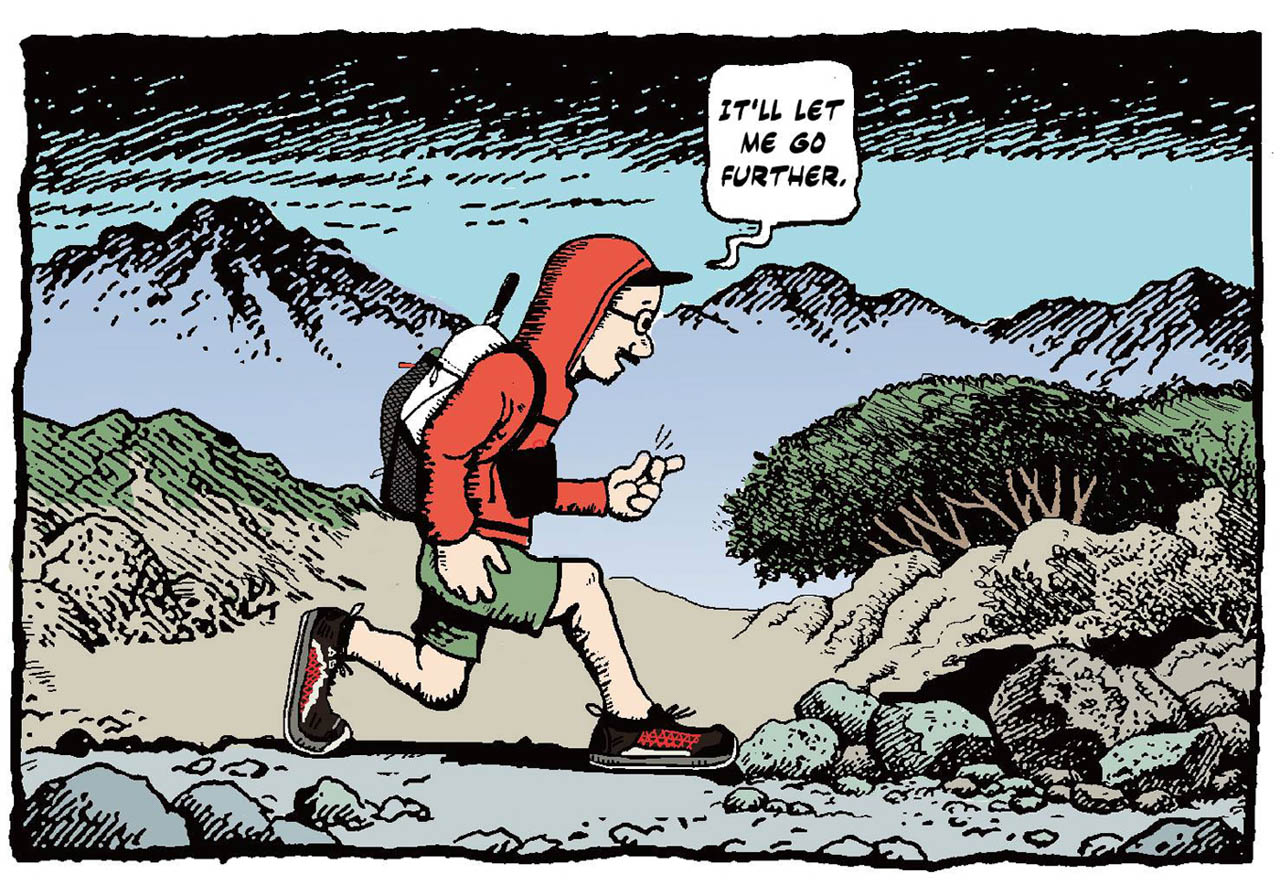
I tried to visualize the ideal backpack for this kind of hiking and came up with an image of a small, simple, and obviously lightweight backpack that I thought would be “just the right thing.” It didn’t have to be either eccentric-looking or technically advanced, but a pack I would just grab without any hesitation—just like the classic silnylon backpack I yearned for in the early days of ultralight hiking.
In those days, technically advanced materials such as X-Pac that we use in the THREE backpack, and Cuben hybrid composite were all the talk, while rip-stop nylon material like silnylon was considered a little outdated. But I was determined to create a new backpack with Skylite that has a similar texture to silnylon, in a kind of homage to the simple backpack that brought about ultralight hiking back in the day.
I also decided that the front pocket should be in a mesh.
Before I made THREE with its mesh pocket similar to the one we use on MINI2, I had been skeptical about adopting mesh for the rainy climate of the Japanese mountains. I initially felt mesh pockets were impractical since the rain could easily soak the contents. Even during my hiking test of the mesh-pocketed THREE, I didn’t like how everything seemed to be getting wet in the beginning, but after several days of hiking, I gradually came to like the function of the mesh pocket. I could stow my still moist tent in the morning without much thought, and the mesh material allowed me to easily see what was inside the pocket.
Sure, things could get wet easily in a mesh pocket, but they would dry quickly too. Hiking became more carefree and natural for me than ever before, and the mesh pocket perfectly synced with my feelings at that time.
With all this in mind, I decided to base the new design on our MINI, but in different materials and with mesh pockets. The original MINI fits your body when you carry it on the upper part of your back, and it is so comfortable that you feel as though you can go on walking forever. The new pack was going to be an updated version of the MINI so I simply called it MINI2.
In 2015, I traveled from the Japan Sea to the Pacific Ocean, traversing through the mountains in a fastpacking style with a prototype of the MINI2.
It was autumn, and the first snow of the season gently covered the mountains. I carried only the bare essentials to minimize the base weight down to 2.2kg, limiting the total weight, including food and water, to under 5kg.
I was in complete harmony with my surroundings. The journey seemed to open up a whole new world. The MINI2 became like a part of me throughout the journey, allowing me to run parts of the trail and jump from one mountain to the other as I had initially dreamed of doing.
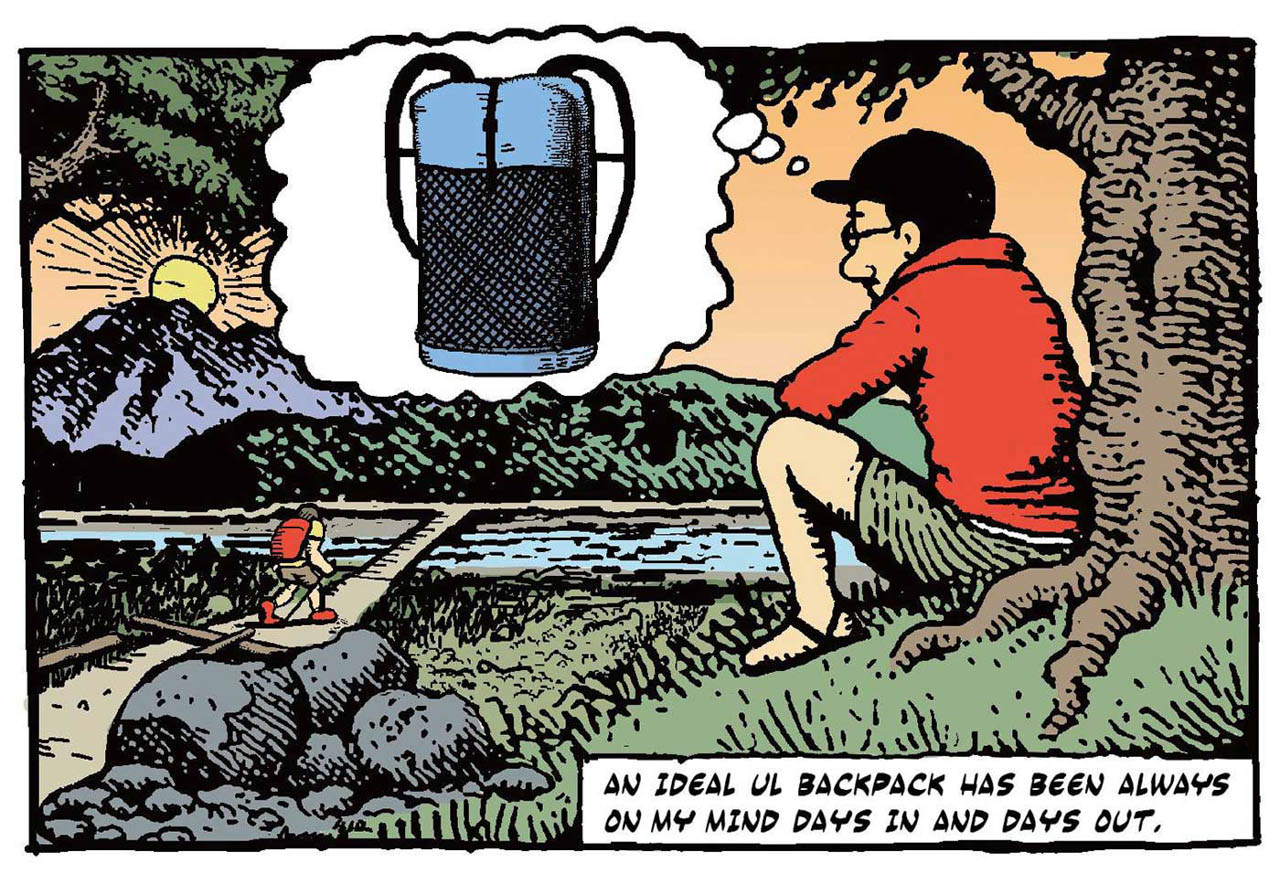
Illustration: Jerry Ukai
I tried to visualize the ideal backpack for this kind of hiking and came up with an image of a small, simple, and obviously lightweight backpack that I thought would be “just the right thing.” It didn’t have to be either eccentric-looking or technically advanced, but a pack I would just grab without any hesitation—just like the classic silnylon backpack I yearned for in the early days of ultralight hiking.
In those days, technically advanced materials such as X-Pac that we use in the THREE backpack, and Cuben hybrid composite were all the talk, while rip-stop nylon material like silnylon was considered a little outdated. But I was determined to create a new backpack with Skylite that has a similar texture to silnylon, in a kind of homage to the simple backpack that brought about ultralight hiking back in the day.
I also decided that the front pocket should be in a mesh.
Before I made THREE with its mesh pocket similar to the one we use on MINI2, I had been skeptical about adopting mesh for the rainy climate of the Japanese mountains. I initially felt mesh pockets were impractical since the rain could easily soak the contents. Even during my hiking test of the mesh-pocketed THREE, I didn’t like how everything seemed to be getting wet in the beginning, but after several days of hiking, I gradually came to like the function of the mesh pocket. I could stow my still moist tent in the morning without much thought, and the mesh material allowed me to easily see what was inside the pocket.
Sure, things could get wet easily in a mesh pocket, but they would dry quickly too. Hiking became more carefree and natural for me than ever before, and the mesh pocket perfectly synced with my feelings at that time.
With all this in mind, I decided to base the new design on our MINI, but in different materials and with mesh pockets. The original MINI fits your body when you carry it on the upper part of your back, and it is so comfortable that you feel as though you can go on walking forever. The new pack was going to be an updated version of the MINI so I simply called it MINI2.
In 2015, I traveled from the Japan Sea to the Pacific Ocean, traversing through the mountains in a fastpacking style with a prototype of the MINI2.
It was autumn, and the first snow of the season gently covered the mountains. I carried only the bare essentials to minimize the base weight down to 2.2kg, limiting the total weight, including food and water, to under 5kg.
I was in complete harmony with my surroundings. The journey seemed to open up a whole new world. The MINI2 became like a part of me throughout the journey, allowing me to run parts of the trail and jump from one mountain to the other as I had initially dreamed of doing.
I use MINI2 daily now, and I just use waterproof Ziplocs when I stow items in the mesh pocket on a rainy day.
Without a doubt, MINI2 is more of a mountain-oriented backpack than a town-use daypack. And I can’t wait to take it on another long trail soon again. (Originally written in 2016)
Product Story 2
Designing with Depth
To create a more thoughtful, collaborative approach to fabric development, we turned to Pertex with an idea: what if we made a fabric specifically for backpacks?
Meeting Pertex for the First Time
By the time I had become obsessed with hiking and before founding Yamatomichi, Pertex was already well-known as a go-to brand for lightweight, high-performance fabrics in technical outdoor gear. Our first real encounter came around the time we started Yamatomichi, when my wife and I visited a Pertex trade show.
We didn’t know that attendance was by appointment only. Completely unaware, the two of us just showed up without a reservation.
The staff seemed a bit surprised to see us at first—but rather than turning us away, they listened with genuine curiosity. Mr. Ko, the representative we spoke with, admitted later that we were the first people ever to show up unannounced. But he found our story interesting and gave us his full attention. He still laughs about it to this day.
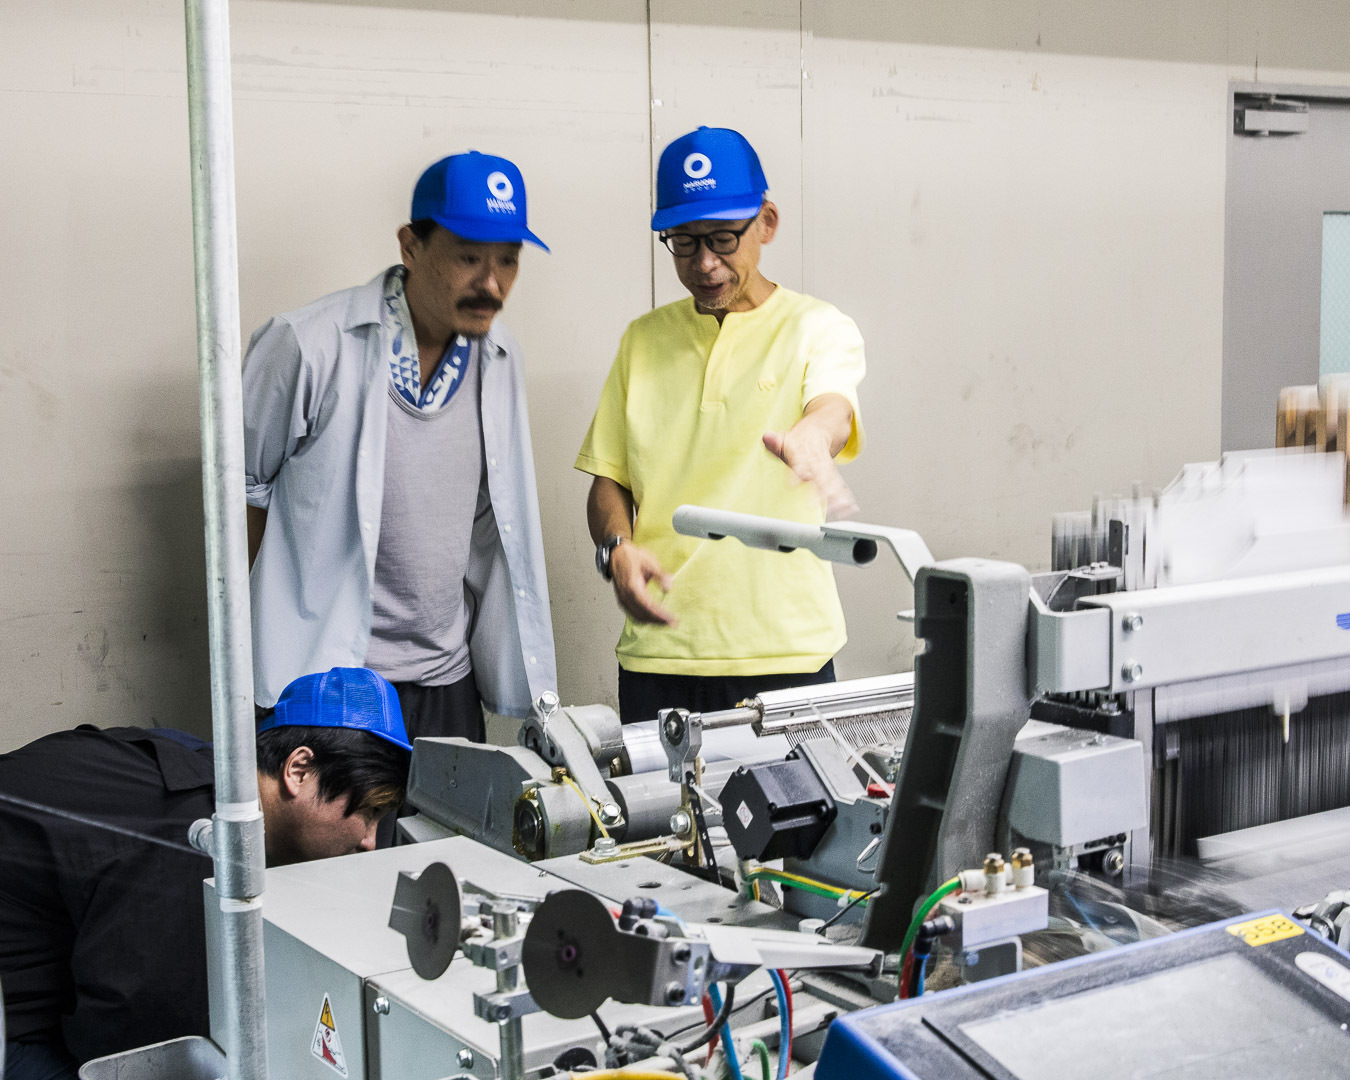
Right: Mr. Ko from Pertex. Left and center: Yamatomichi product team members Hirono and Nakagawa (photo taken during a factory visit).
We started by using existing Pertex fabrics, but things changed when we asked them to help develop a fabric for our DW 5-Pocket Pants. Taslan nylon, the fabric we were using at the time for our 5-Pocket Pants, lacked stretch and had a tendency to stick to the skin when sweaty. To solve that, Pertex created a custom fabric just for us.
Since then, we’ve worked with them to develop a range of original materials focused on lightness and function. Today, nearly every Pertex fabric used in Yamatomichi products is designed specifically for us.
An Idea Worth Weaving
At a Pertex trade show one year, while browsing their latest lightweight fabrics for apparel, we were once again struck by the depth and precision of their high-strength materials. That moment sparked a new idea—if Pertex were to develop a fabric for backpacks, it could lead to something truly unique.
A First for Pertex
Thanks to the trust built over years of collaboration, Pertex agreed to take on the challenge. It was a first for them—developing a fabric specifically for backpacks marked a completely new direction beyond their established lines like Shield or Quantum.
One of the most memorable decisions in the process was their choice to use nylon 6 instead of the typically stronger nylon 66. This allowed for a different balance of strength, texture, and weight. Additionally, by dyeing all components at the same factory, they achieved a consistent color tone across different fabric types—bringing visual unity to the final product.
The result is a fabric that goes beyond technical performance. It offers a refined handfeel and tonal richness that gives each backpack a distinct, elevated finish.
Through this collaboration with Pertex, we’re continuing to explore new and meaningful ways to approach design and materials.
Form and Function
Designed for Comfortable Hiking
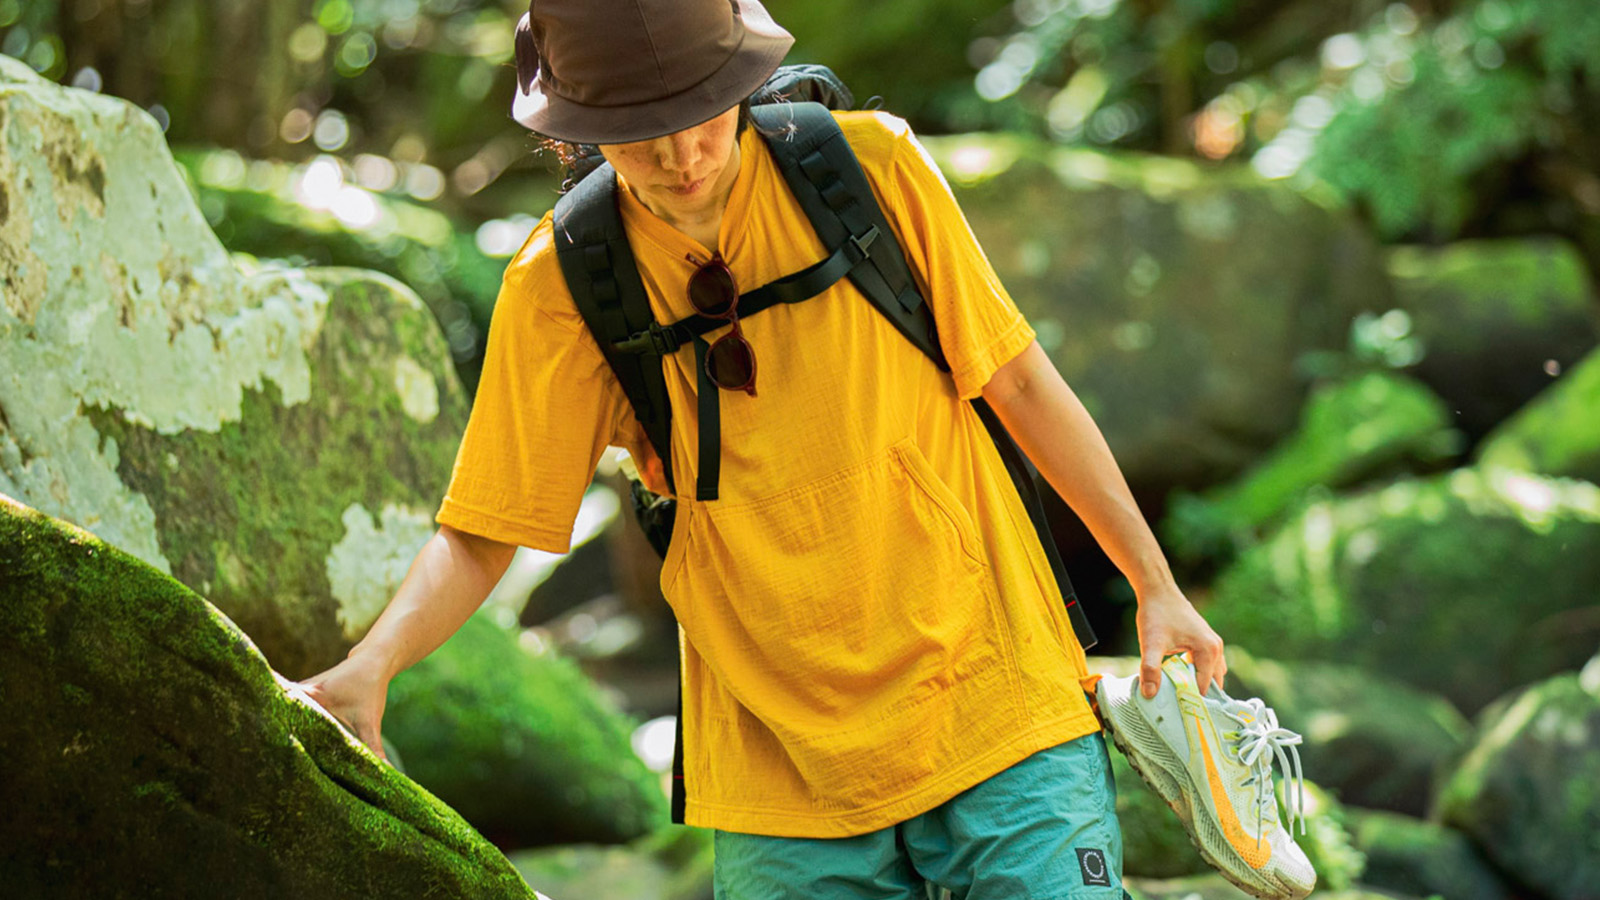
The MINI2 is designed to carry up to around eight kilograms of total weight and comfortably distribute the load in the upper back part of your torso, as well as around your chest without relying on your waist to support the weight. This frees your waist from the load and makes it easy for you to comfortably walk around the often steep mountain trails in Japan.
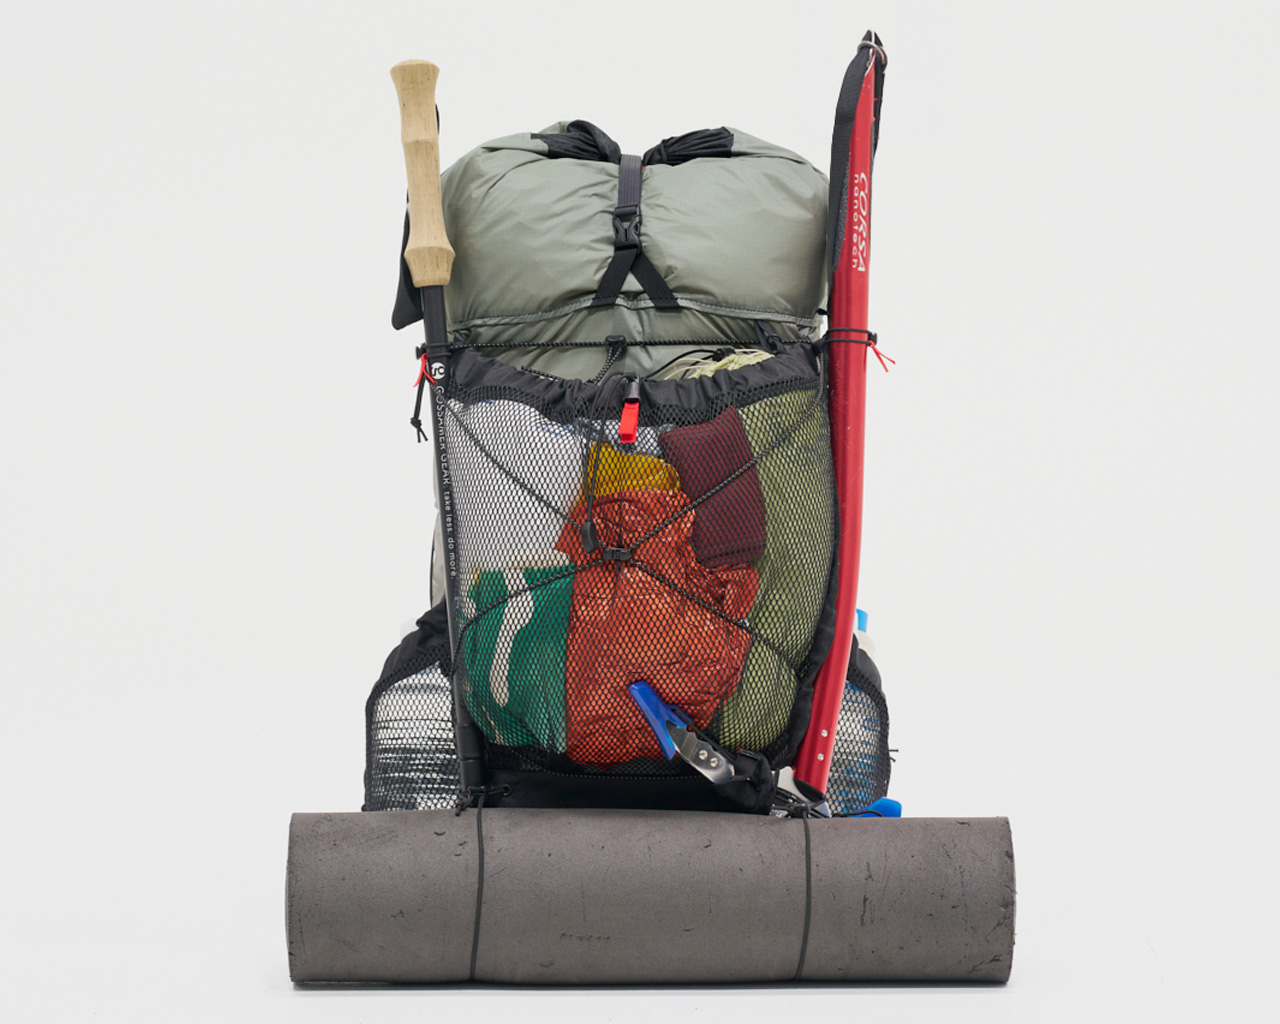
High Capacity Mesh Pocket
Suppose you wake up in the morning to find it raining, pack up all your gear inside the tent, or under the tarp, and you are almost ready to leave, but what do you do with the tent you are in? With our lidless MINI2, you just tuck the tent in the front pocket after packing up everything else inside and are ready to go.
Highly Versatile
The MINI2 has a long roll top, large-volume front pocket, and side pockets with a capacity total of over 30 liters. You can be creative and use the top strap, bungee cords and bottom attachment loops to carry even more.
Anatomy of the MINI2
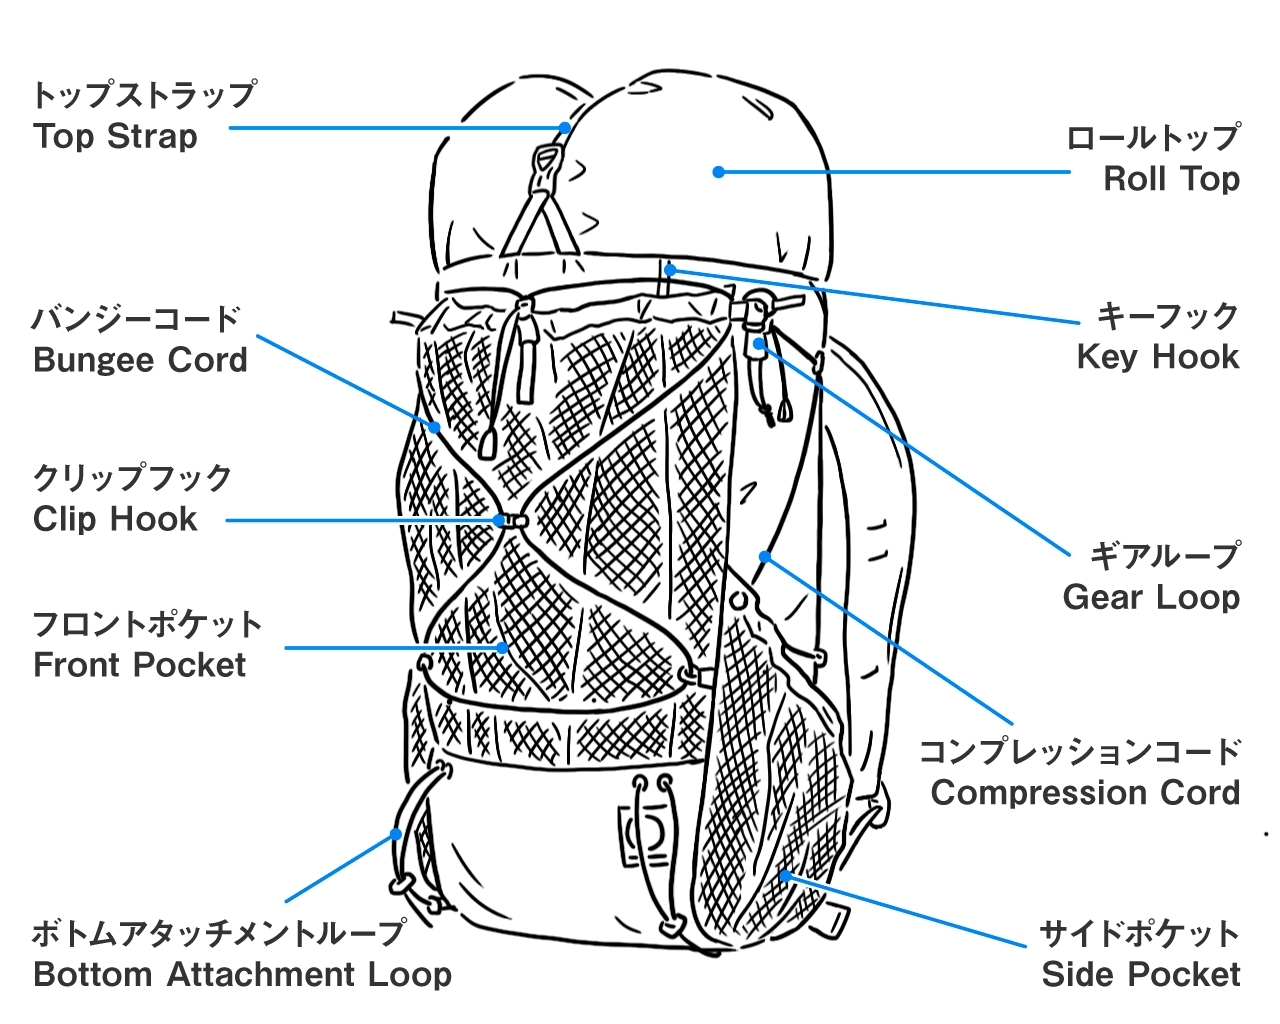
Hold the red tape and pull the tab to close/open the roll top.
Each side pocket has ample room for two 500ml pet bottles. Release the shoulder strap adjuster to easily reach them.
Pull the red tab to instantly open the front pocket. Draw the cord for quick closure.
The front bungee cord can be unclipped in a single action.
The gear loops and bottom attachment loops can hold trekking poles or an ice ax without obstructing the use of the front and side pockets.
A light sleeping pad can be attached to the bottom attachment loops. It can also be fixed vertically where branches are dense for easy walking.
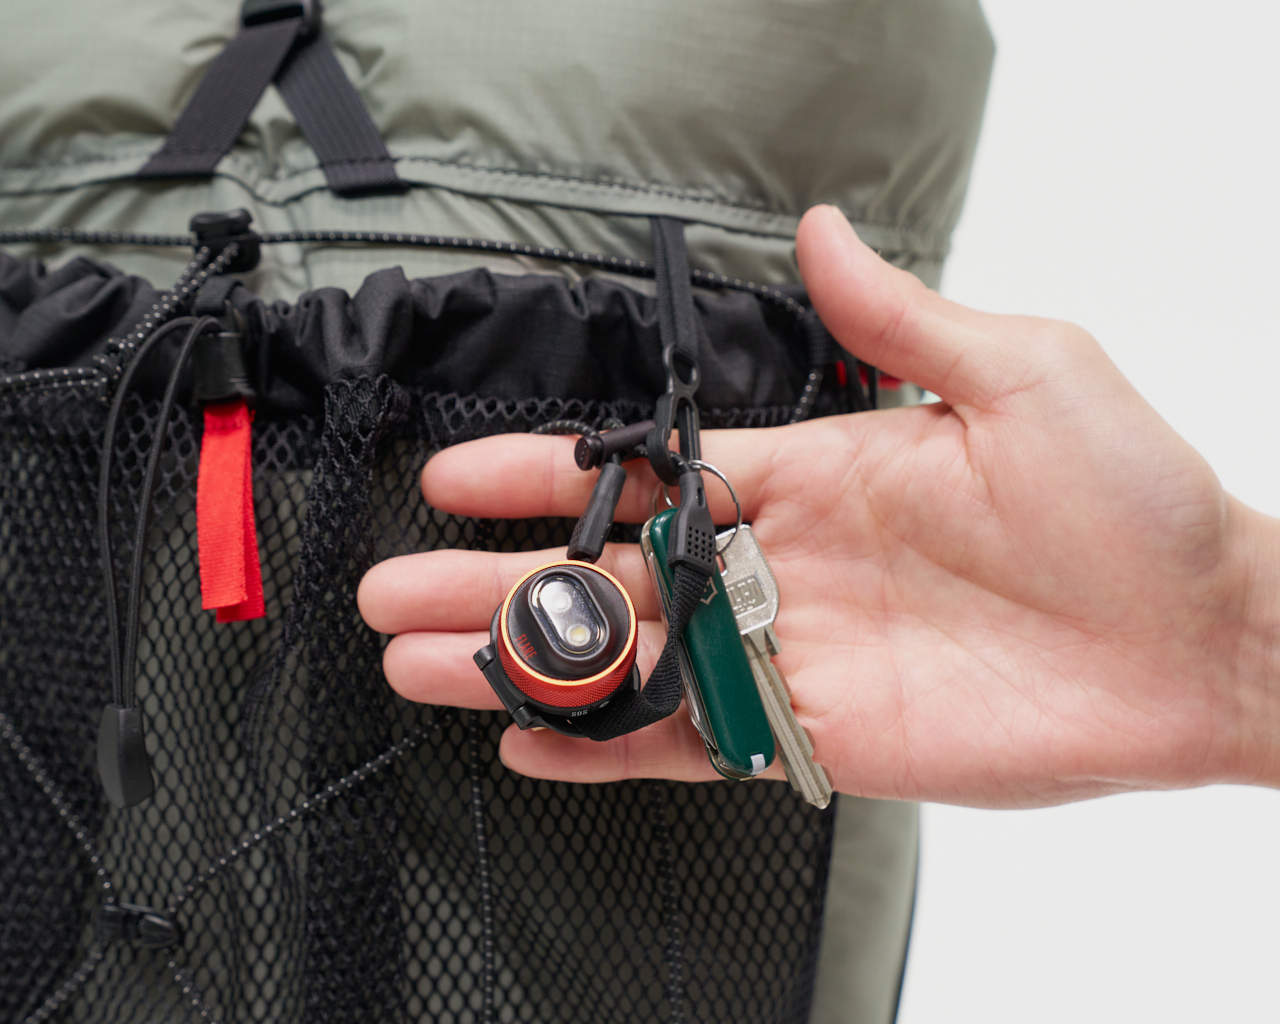
The front pocket has a key hook, where the headlight and multi-tool can be attached.
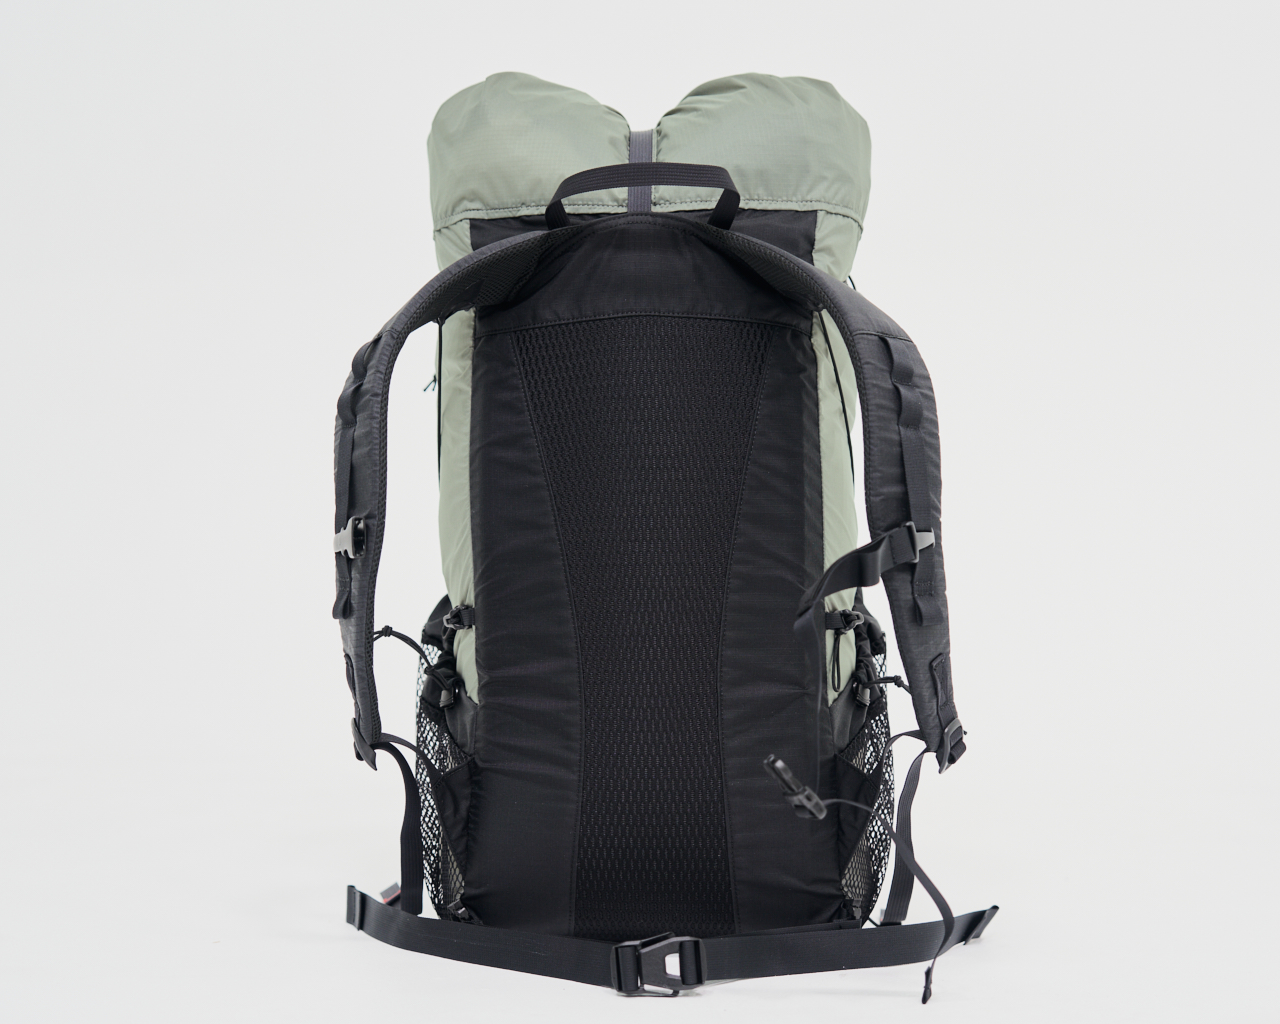
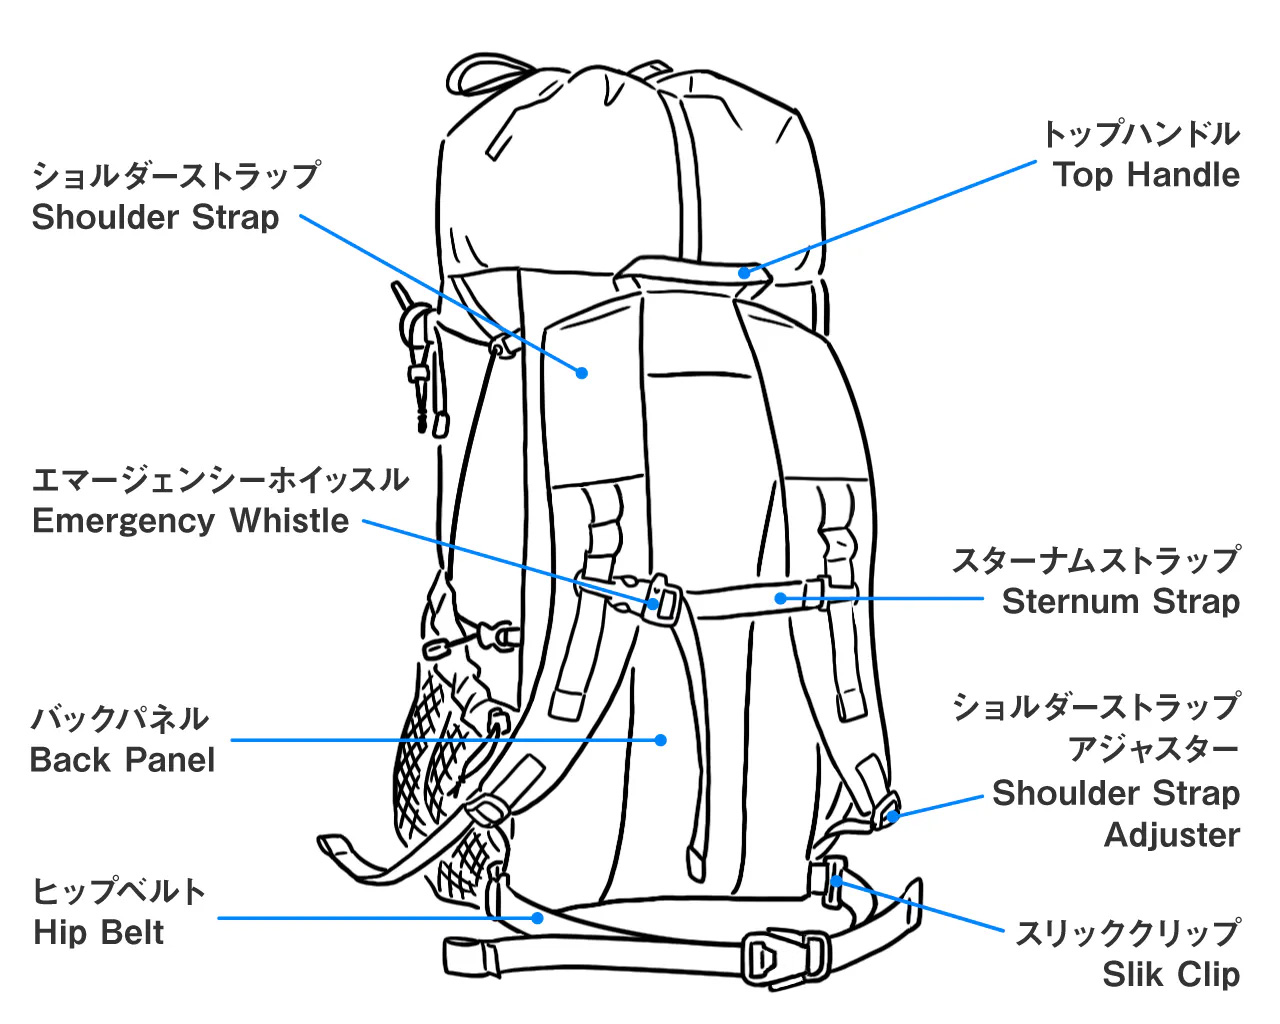
The back uses a mesh material for better grip and stability.
After packing everything, draw the compression cords on both sides to keep the items closer to your back, increasing the stability.
The sternum strap can be easily opened/closed with a single hand when your other hand is busy.

A small emergency whistle is incorporated in the buckle.
If you intend to use MINI2 for fastpacking or running, an accessory hip belt can be attached. Please note that the hip belt is solely for better stability, not for load distribution to your waist. The Slik Clip can be easily released by pushing the arch part.
Integrated Minimalist Pad
We have included a Minimalist Pad (H45cmxW90cmxD0.5cm/43g) in the back of the MINI. The Minimalist Pad is removable and can be used as a sleeping pad or an emergency pad to keep you warm.
How to Carry
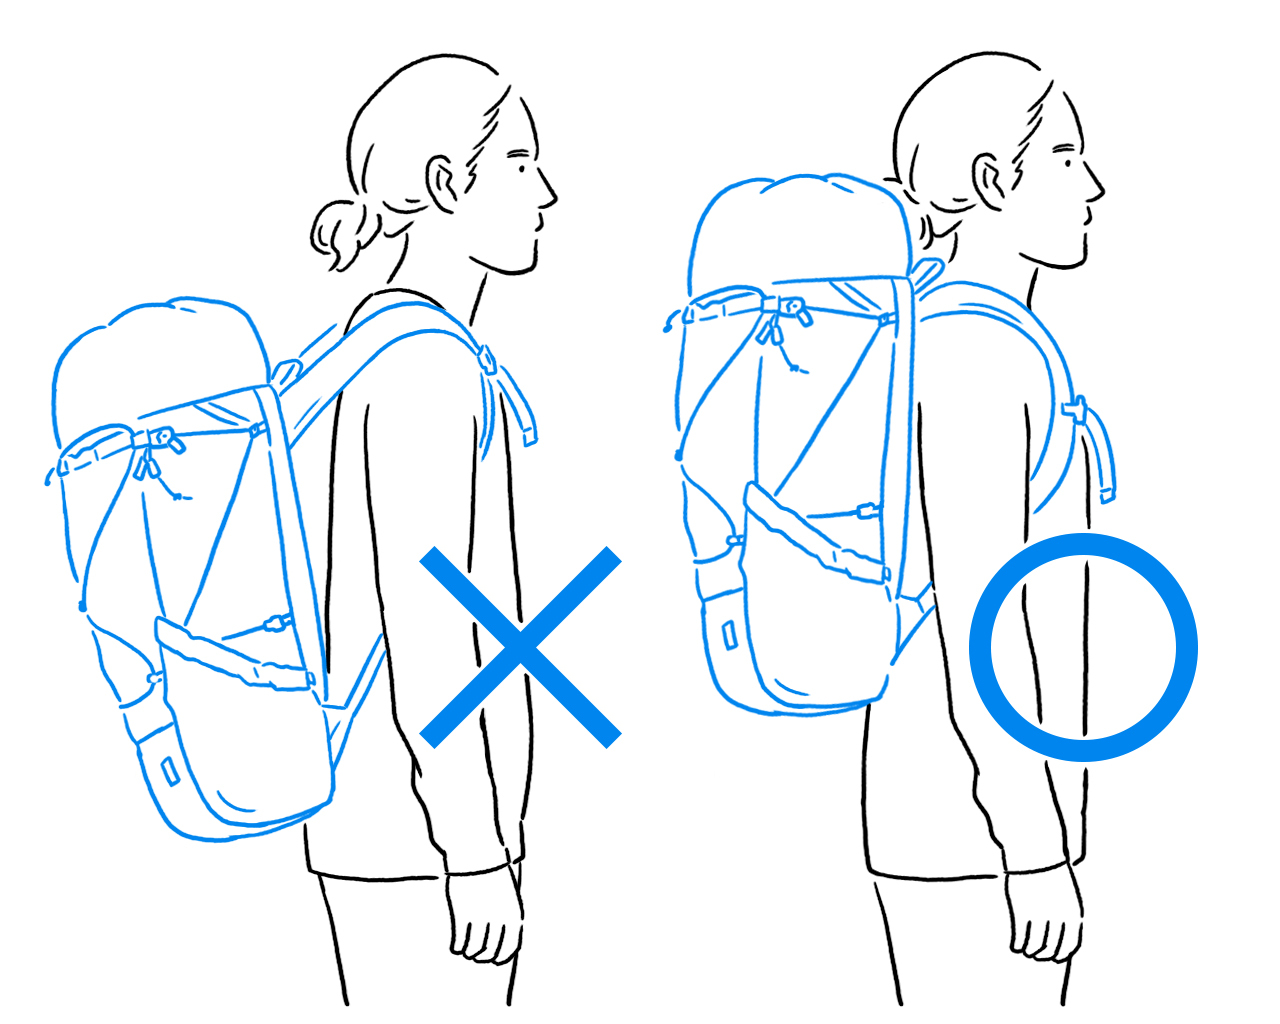
Please make sure to position the MINI2 as high as possible in the upper part of your back. It is designed to carry up to approximately 8kg total weight. The shoulder straps are designed to comfortably distribute the load in the upper part of your torso. By shouldering the MINI2 in this way, you will carry the backpack entirely using the upper part of your torso comfortably.
If you intend to use MINI2 for fastpacking or running, an accessory hip belt can be attached. Please note that the hip belt is solely for better stability, not for load distribution to your waist.
Options
We offer a number of options to expand the features and capacity of your MINI2.
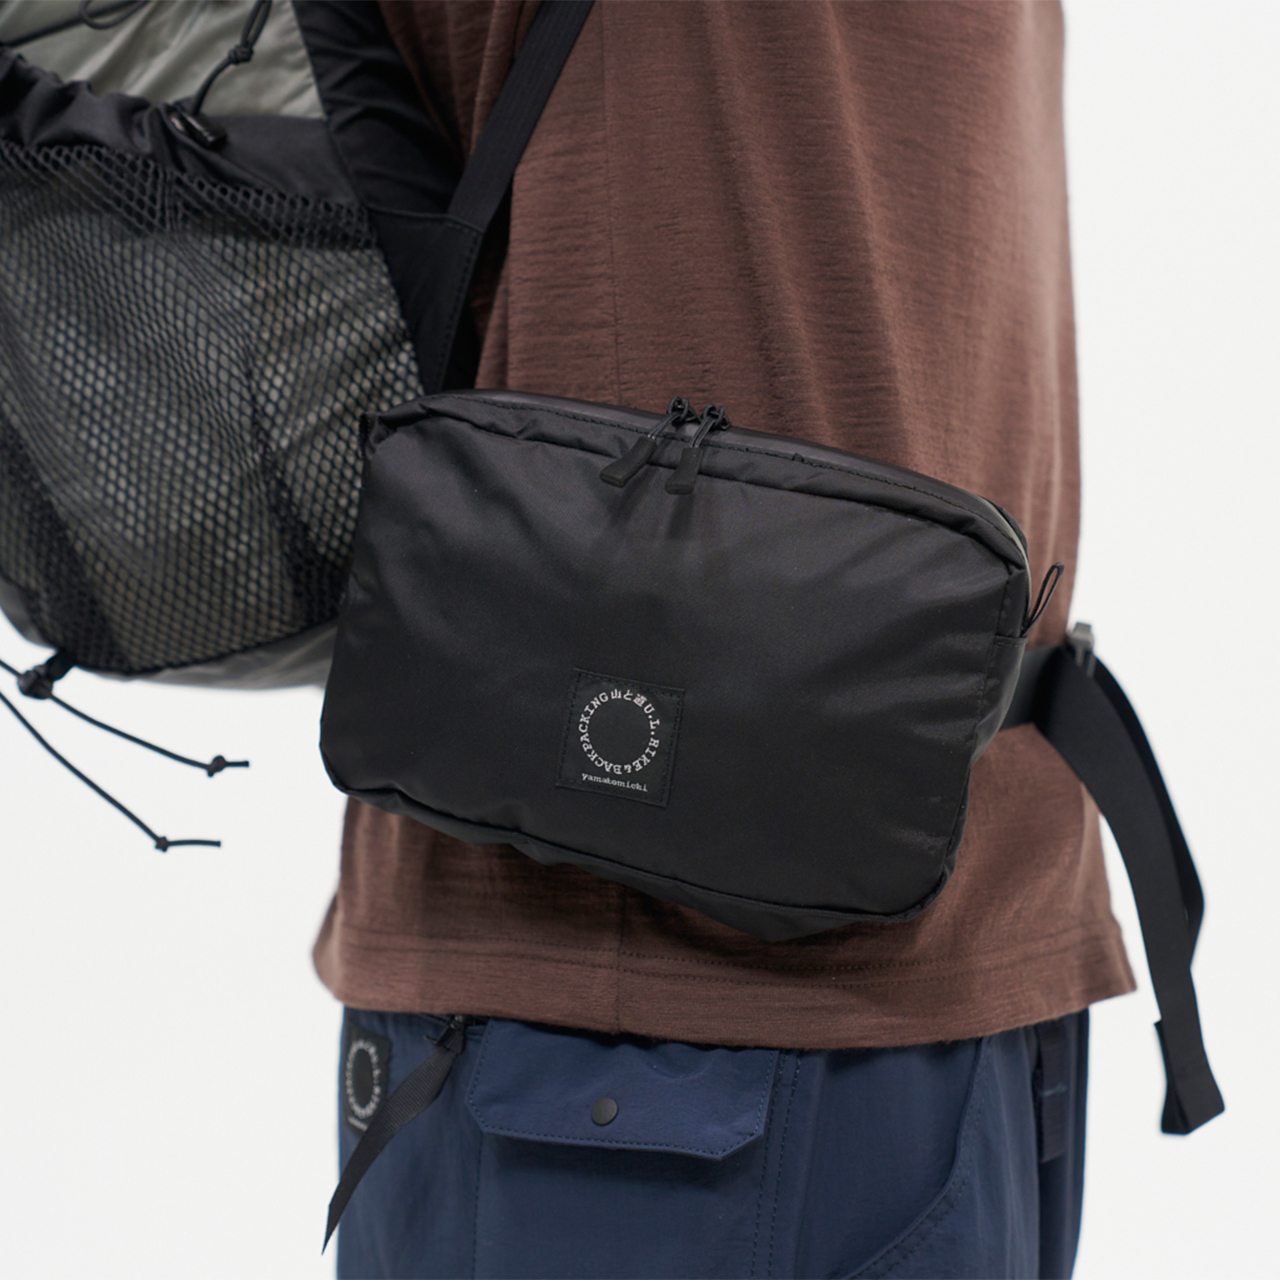
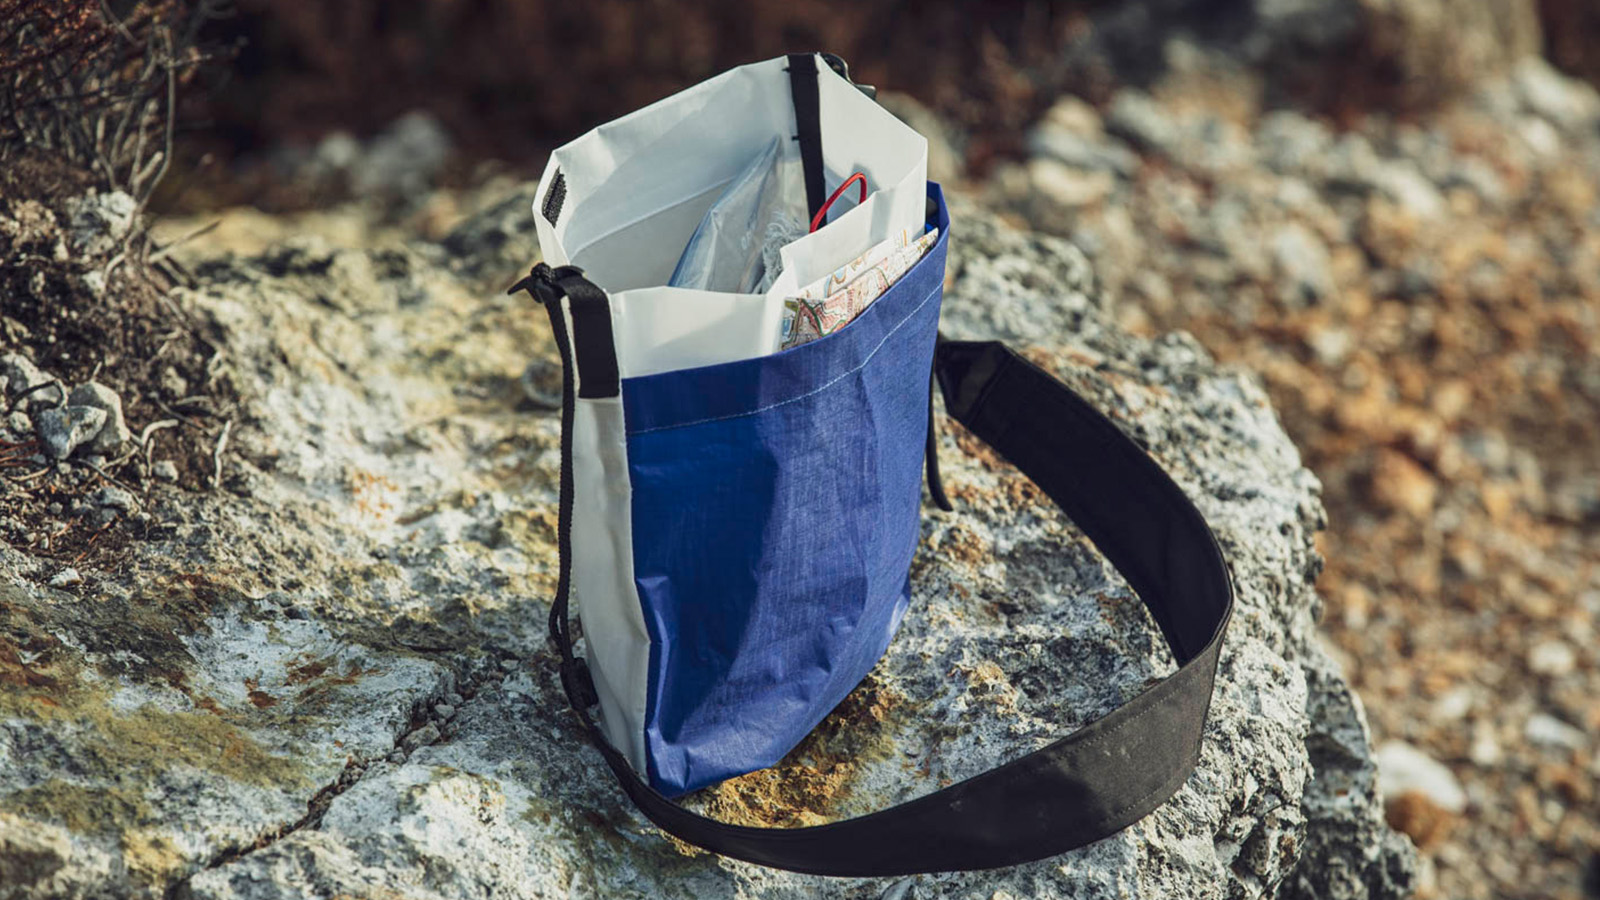
It can be attached to the removable hip belt. This is convenient for stowing keys, valuables, and other items frequently used during hiking.

It can be strapped onto the top of the MINI2. This will add another nine-liter capacity that is convenient for carrying something you would prefer to store separately from the main compartment such as a wet tent, rainwear, or an extra couple of days’ worth of food.

Our Yamatomichi Minimalist Pad is installed in the MINI2’s back panel. If you feel it is too warm on your back during the summer, consider switching it for our Breathable Pad which offers superior ventilation and cushioning.
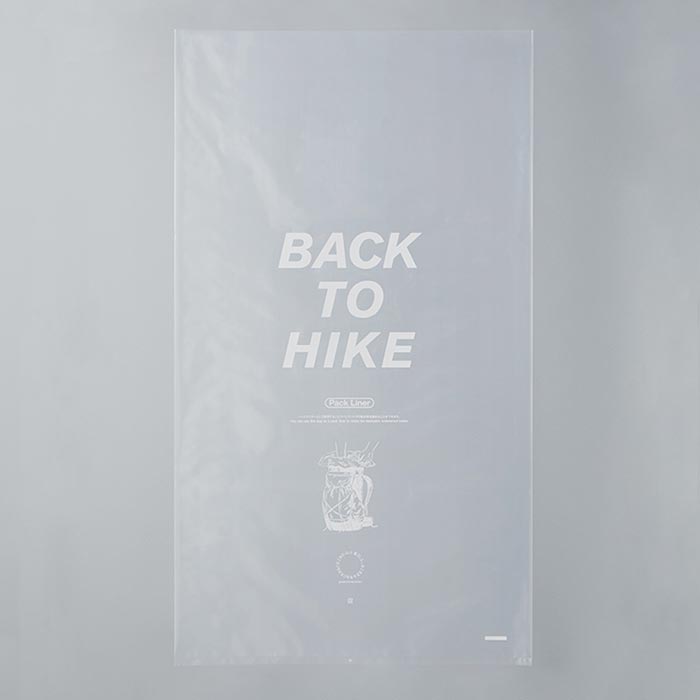
The MINI2 comes with a transparent plastic bag which can be used as a water-resistant pack liner. (Also sold separately)
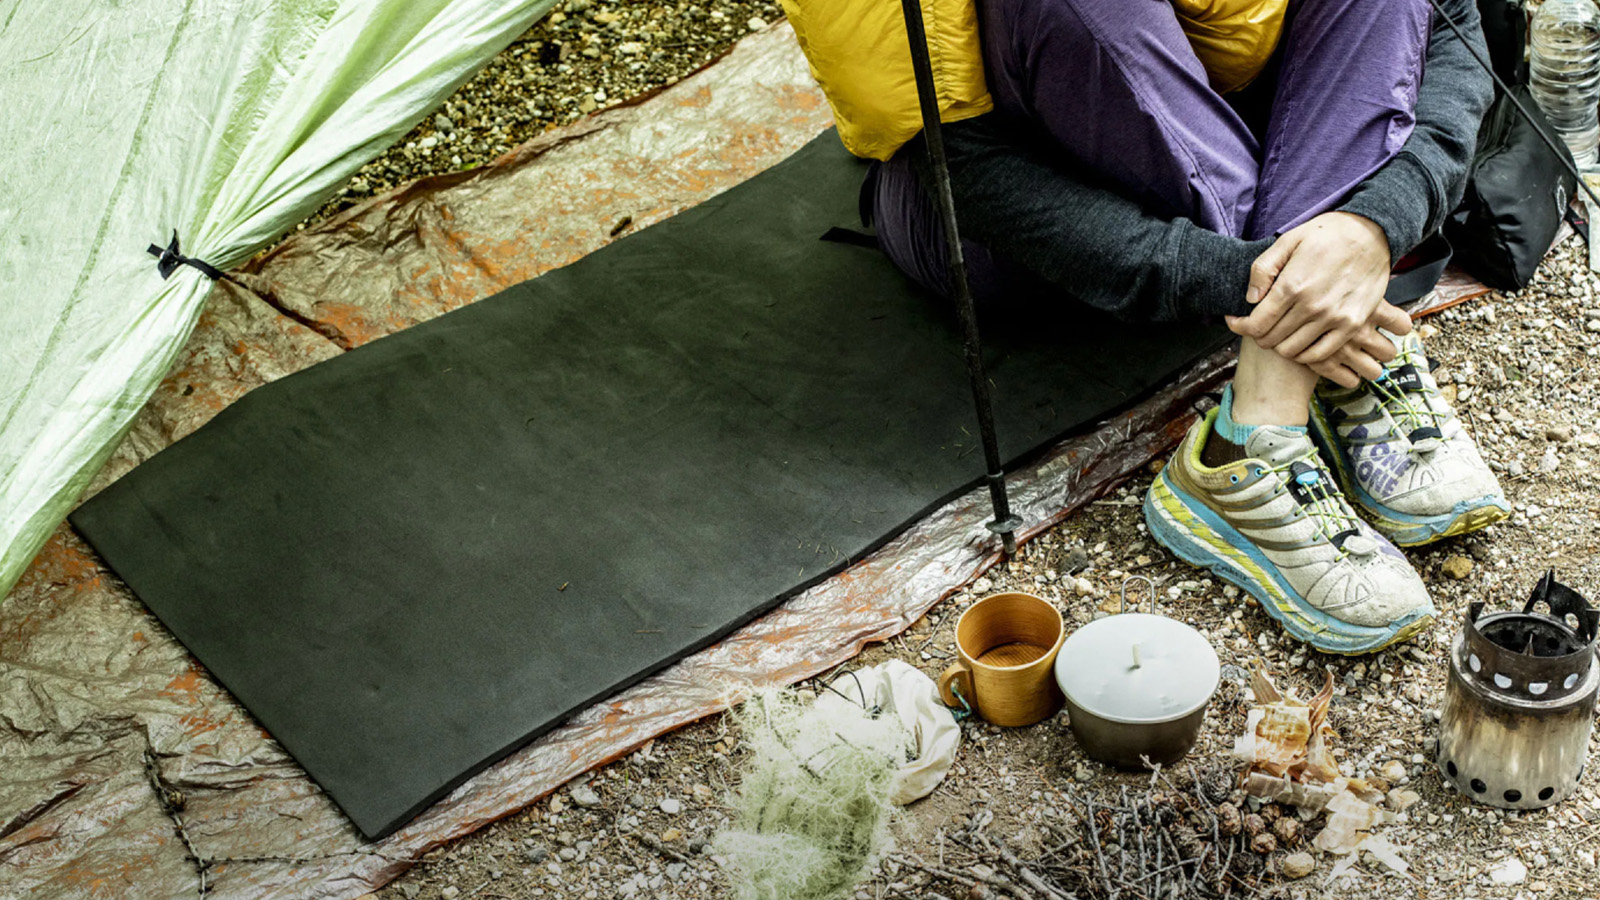
Packing Tips
In the below section, we will show you a packing example from one of our good friends.
What’s the best way to pack the MINI2? It really depends on each hiker. It depends on when, where, why, and how long you hike. Below is just one example of how you could pack the MINI2.
*In ultralight hiking, a 35L to 45L was the standard volume until a few years ago, but in recent years, mountaineering gear has become even lighter and more compact, and now a 25L to 35L class backpack is usually big enough for overnight hikes.
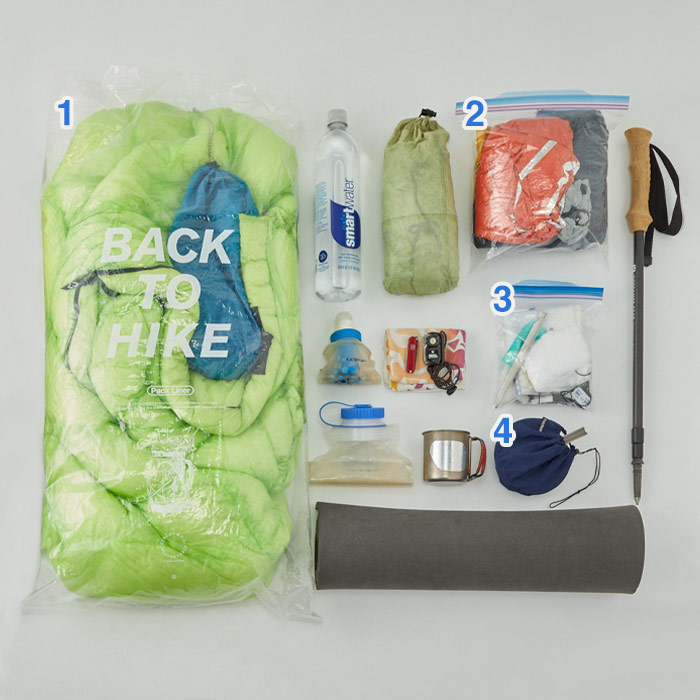
1. Organize the items according to the purpose and use Ziplocs for items that must be kept dry as follows: 1. Sleeping bag, change of clothes. 2. Items needed when you are on the move such as rainwear and warm clothes. 3. Cookware, cutlery. 4. Emergency kit including pain killer, needle, thread, duct tape, elastic tape, rope.
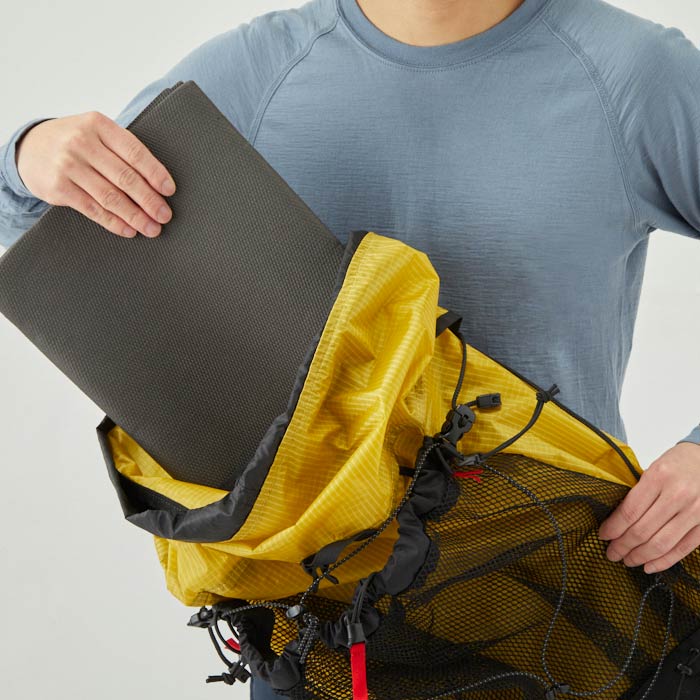
2. Remove the Minimalist Pad from the inside pocket. The Minimalist Pad is useful as a sit pad when you have a break. It can be attached to the front, or the bottom of the MINI2 with the bungee cord and attachment loops.
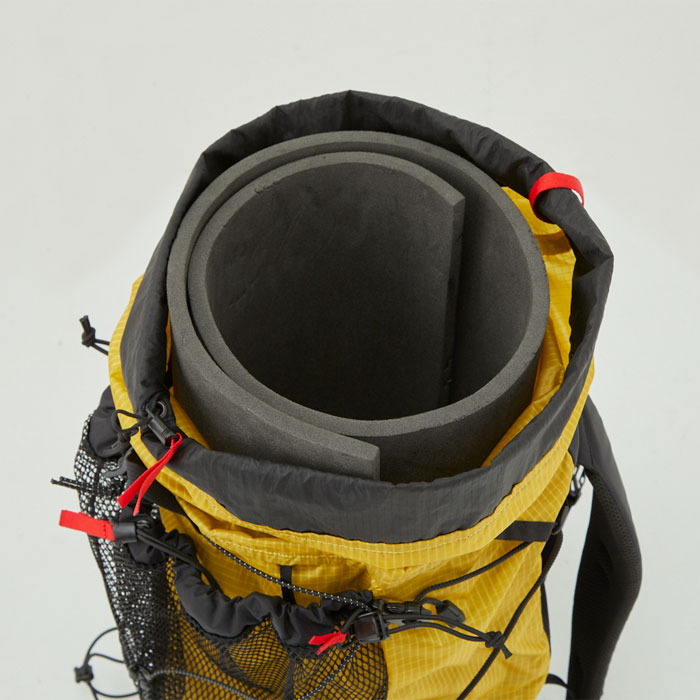
3. Roll up the sleeping pad (the photo shows our UL Pad 15, size S) and place it inside the backpack. The pad will act as a frame inside the backpack and stabilize the whole structure, enhancing the comfort when you carry it.
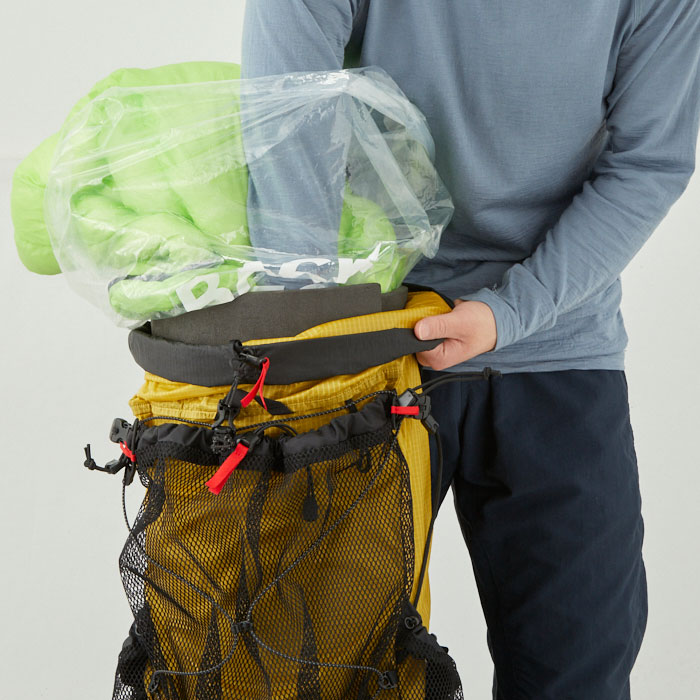
4. Place the pack liner in the backpack and pack something that must not be wet. The sleeping bag should be packed directly in the pack liner*, without its stuff sack.
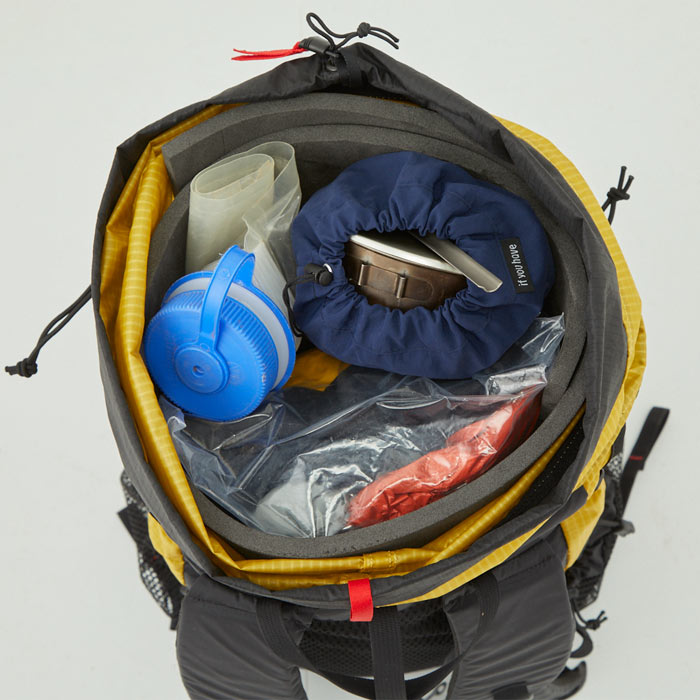
5. Fold the opening of the pack liner several times and close it. Pack something you need when you are on the move on top of the closed pack liner. Place hard items away from your back for better comfort.
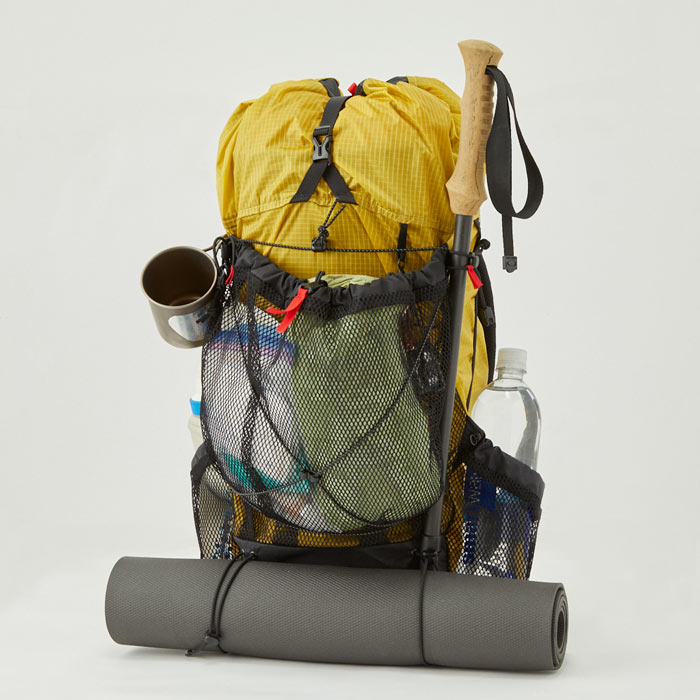
6. In the front pocket, pack items that must be within easy reach when you are hiking including the emergency kit. Attach your headlight, multi-tool, and keys to the key hook. Fix the trekking poles to the gear loops. Strap the Minimalist Pad removed from the inside pocket with the bungee cord or the bottom attachment loops.
1. Organize the items according to the purpose and use Ziplocs for items that must be kept dry as follows: 1. Sleeping bag, change of clothes. 2. Items needed when you are on the move such as rainwear and warm clothes. 3. Cookware, cutlery. 4. Emergency kit including pain killer, needle, thread, duct tape, elastic tape, rope.
2. Remove the Minimalist Pad from the inside pocket. The Minimalist Pad is useful as a sit pad when you have a break. It can be attached to the front, or the bottom of the MINI2 with the bungee cord and attachment loops.
3. Roll up the sleeping pad (the photo shows our UL Pad 15, size S) and place it inside the backpack. The pad will act as a frame inside the backpack and stabilize the whole structure, enhancing the comfort when you carry it.
4. Place the pack liner in the backpack and pack something that must not be wet. The sleeping bag should be packed directly in the pack liner*, without its stuff sack.
5. Fold the opening of the pack liner several times and close it. Pack something you need when you are on the move on top of the closed pack liner. Place hard items away from your back for better comfort.
6. In the front pocket, pack items that must be within easy reach when you are hiking including the emergency kit. Attach your headlight, multi-tool, and keys to the key hook. Fix the trekking poles to the gear loops. Strap the Minimalist Pad removed from the inside pocket with the bungee cord or the bottom attachment loops.
*For the reasons below, it is recommended to pack a sleeping bag directly, without its stuff sack:
1. By packing without the stuff sack, the fill power of the sleeping bag stays fresh.
2. The softness of the sleeping bag enhances the comfort around the hip.
3. The bottom part becomes softer and makes it easier to access the water bottle in the side pockets.
4. The sleeping bag swells and fills the gap inside the pack, thus improving the stability.
5. The light sleeping bag is allocated at the lower part, while the heavy items are at the upper part, providing a good load balance and comfort.
Material
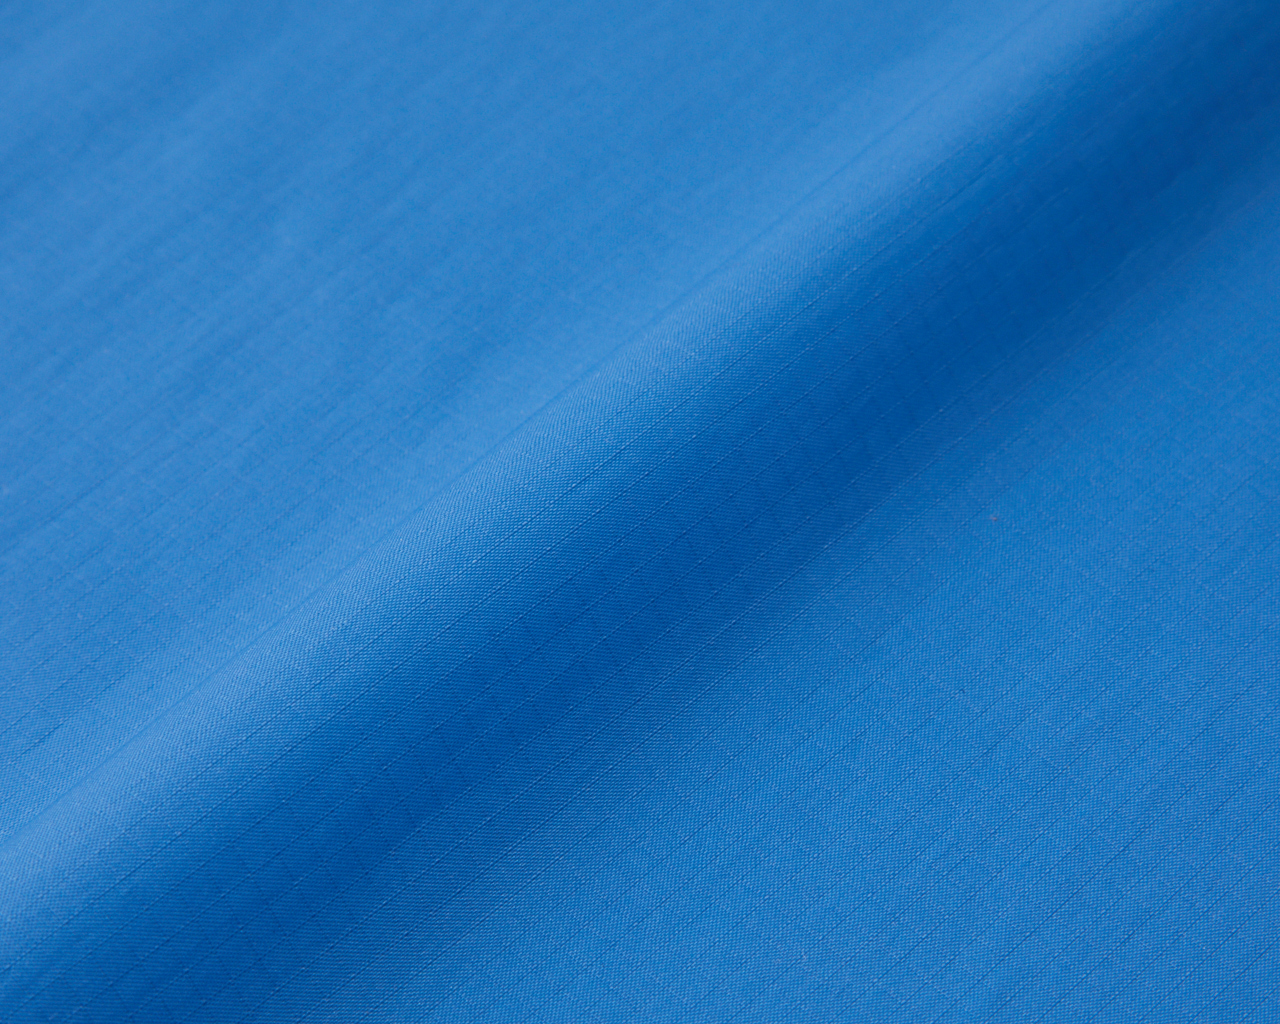
Pertex®︎07RS-PC
The main body features a proprietary 70-denier fabric developed in collaboration with Yamatomichi and Pertex. Its optimal weave structure and soft, impact-dispersing design achieve both the lightness essential for an ultralight backpack and strength that surpasses standard nylon. Paired with a durable, hydrolysis-resistant polycarbonate coating, the fabric offers enhanced durability and long-term performance.
Backpack Material Comparison
Combining strength and lightness is no easy feat. By leveraging the unique properties of nylon 6, we set out to create a fabric that surpasses the strength of conventional backpack-grade nylon—without compromising on weight.
A precisely engineered weave and advanced coating technology give the fabric both flexibility and resilience, allowing it to absorb impact while maintaining long-term durability in the field.
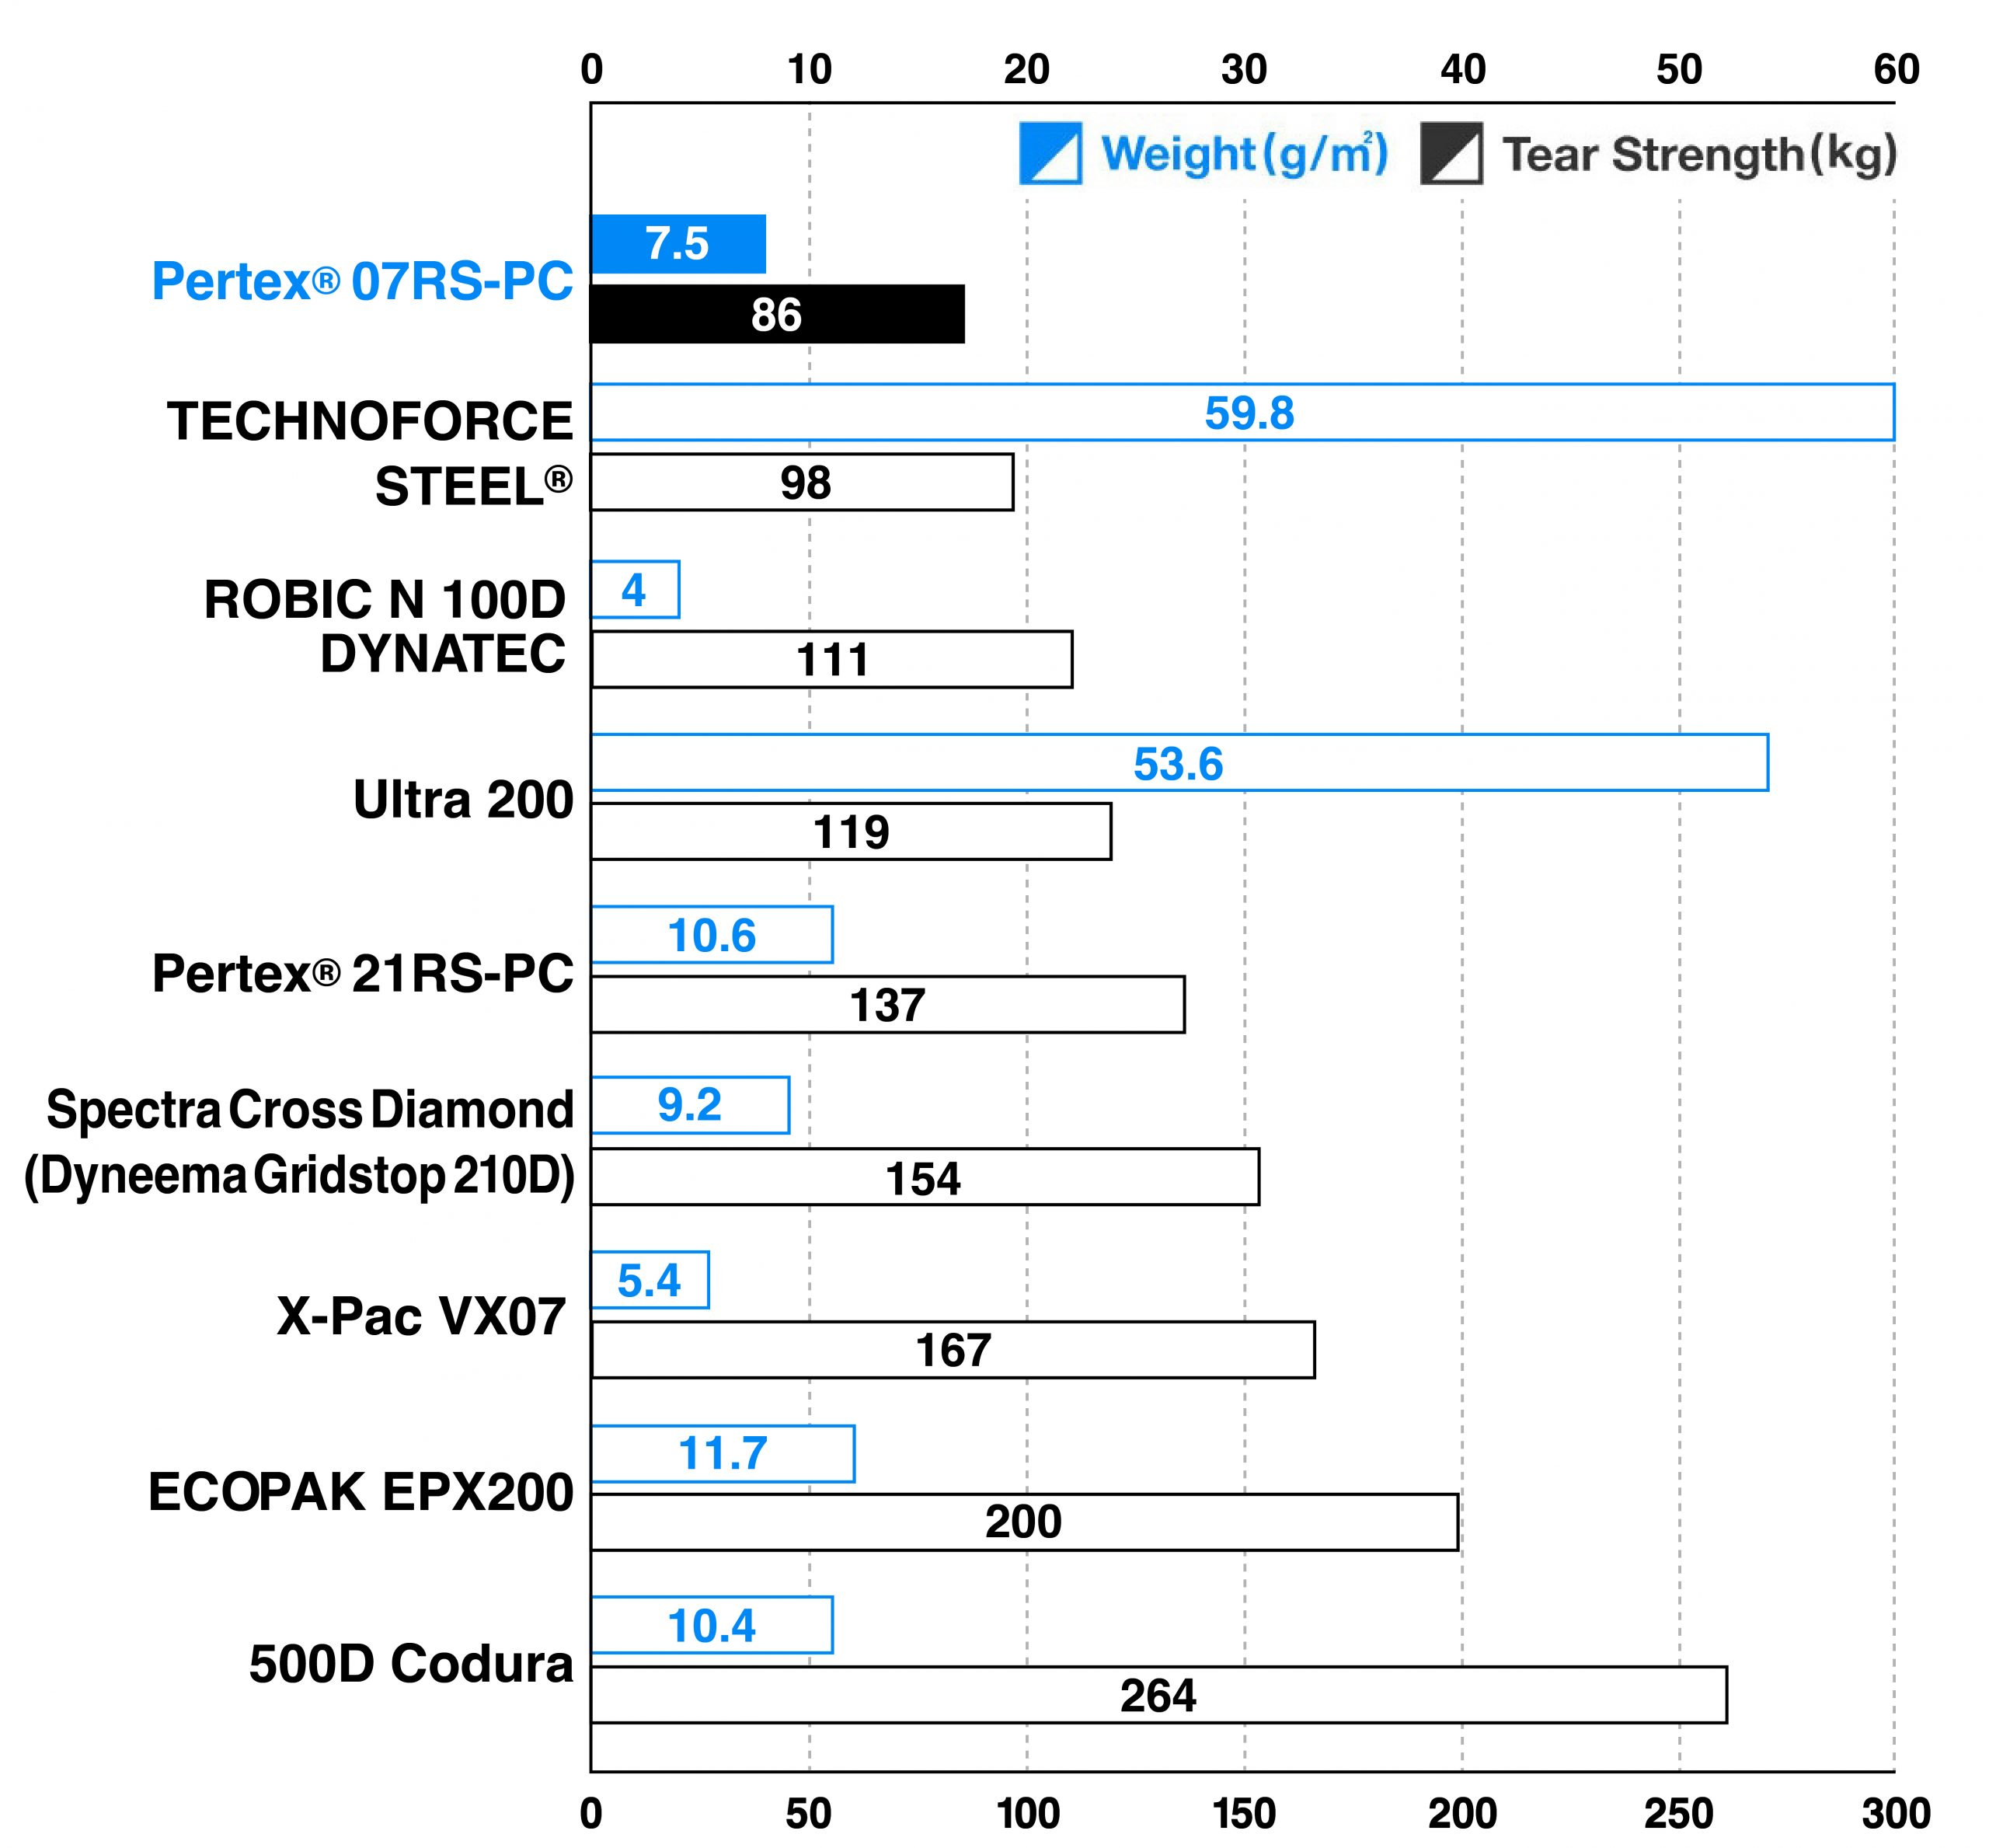
Fabric Strength Relative to Weight (kg per g/㎡)
To highlight the relationship between weight and durability, the materials are ordered by tear strength per gram of fabric.
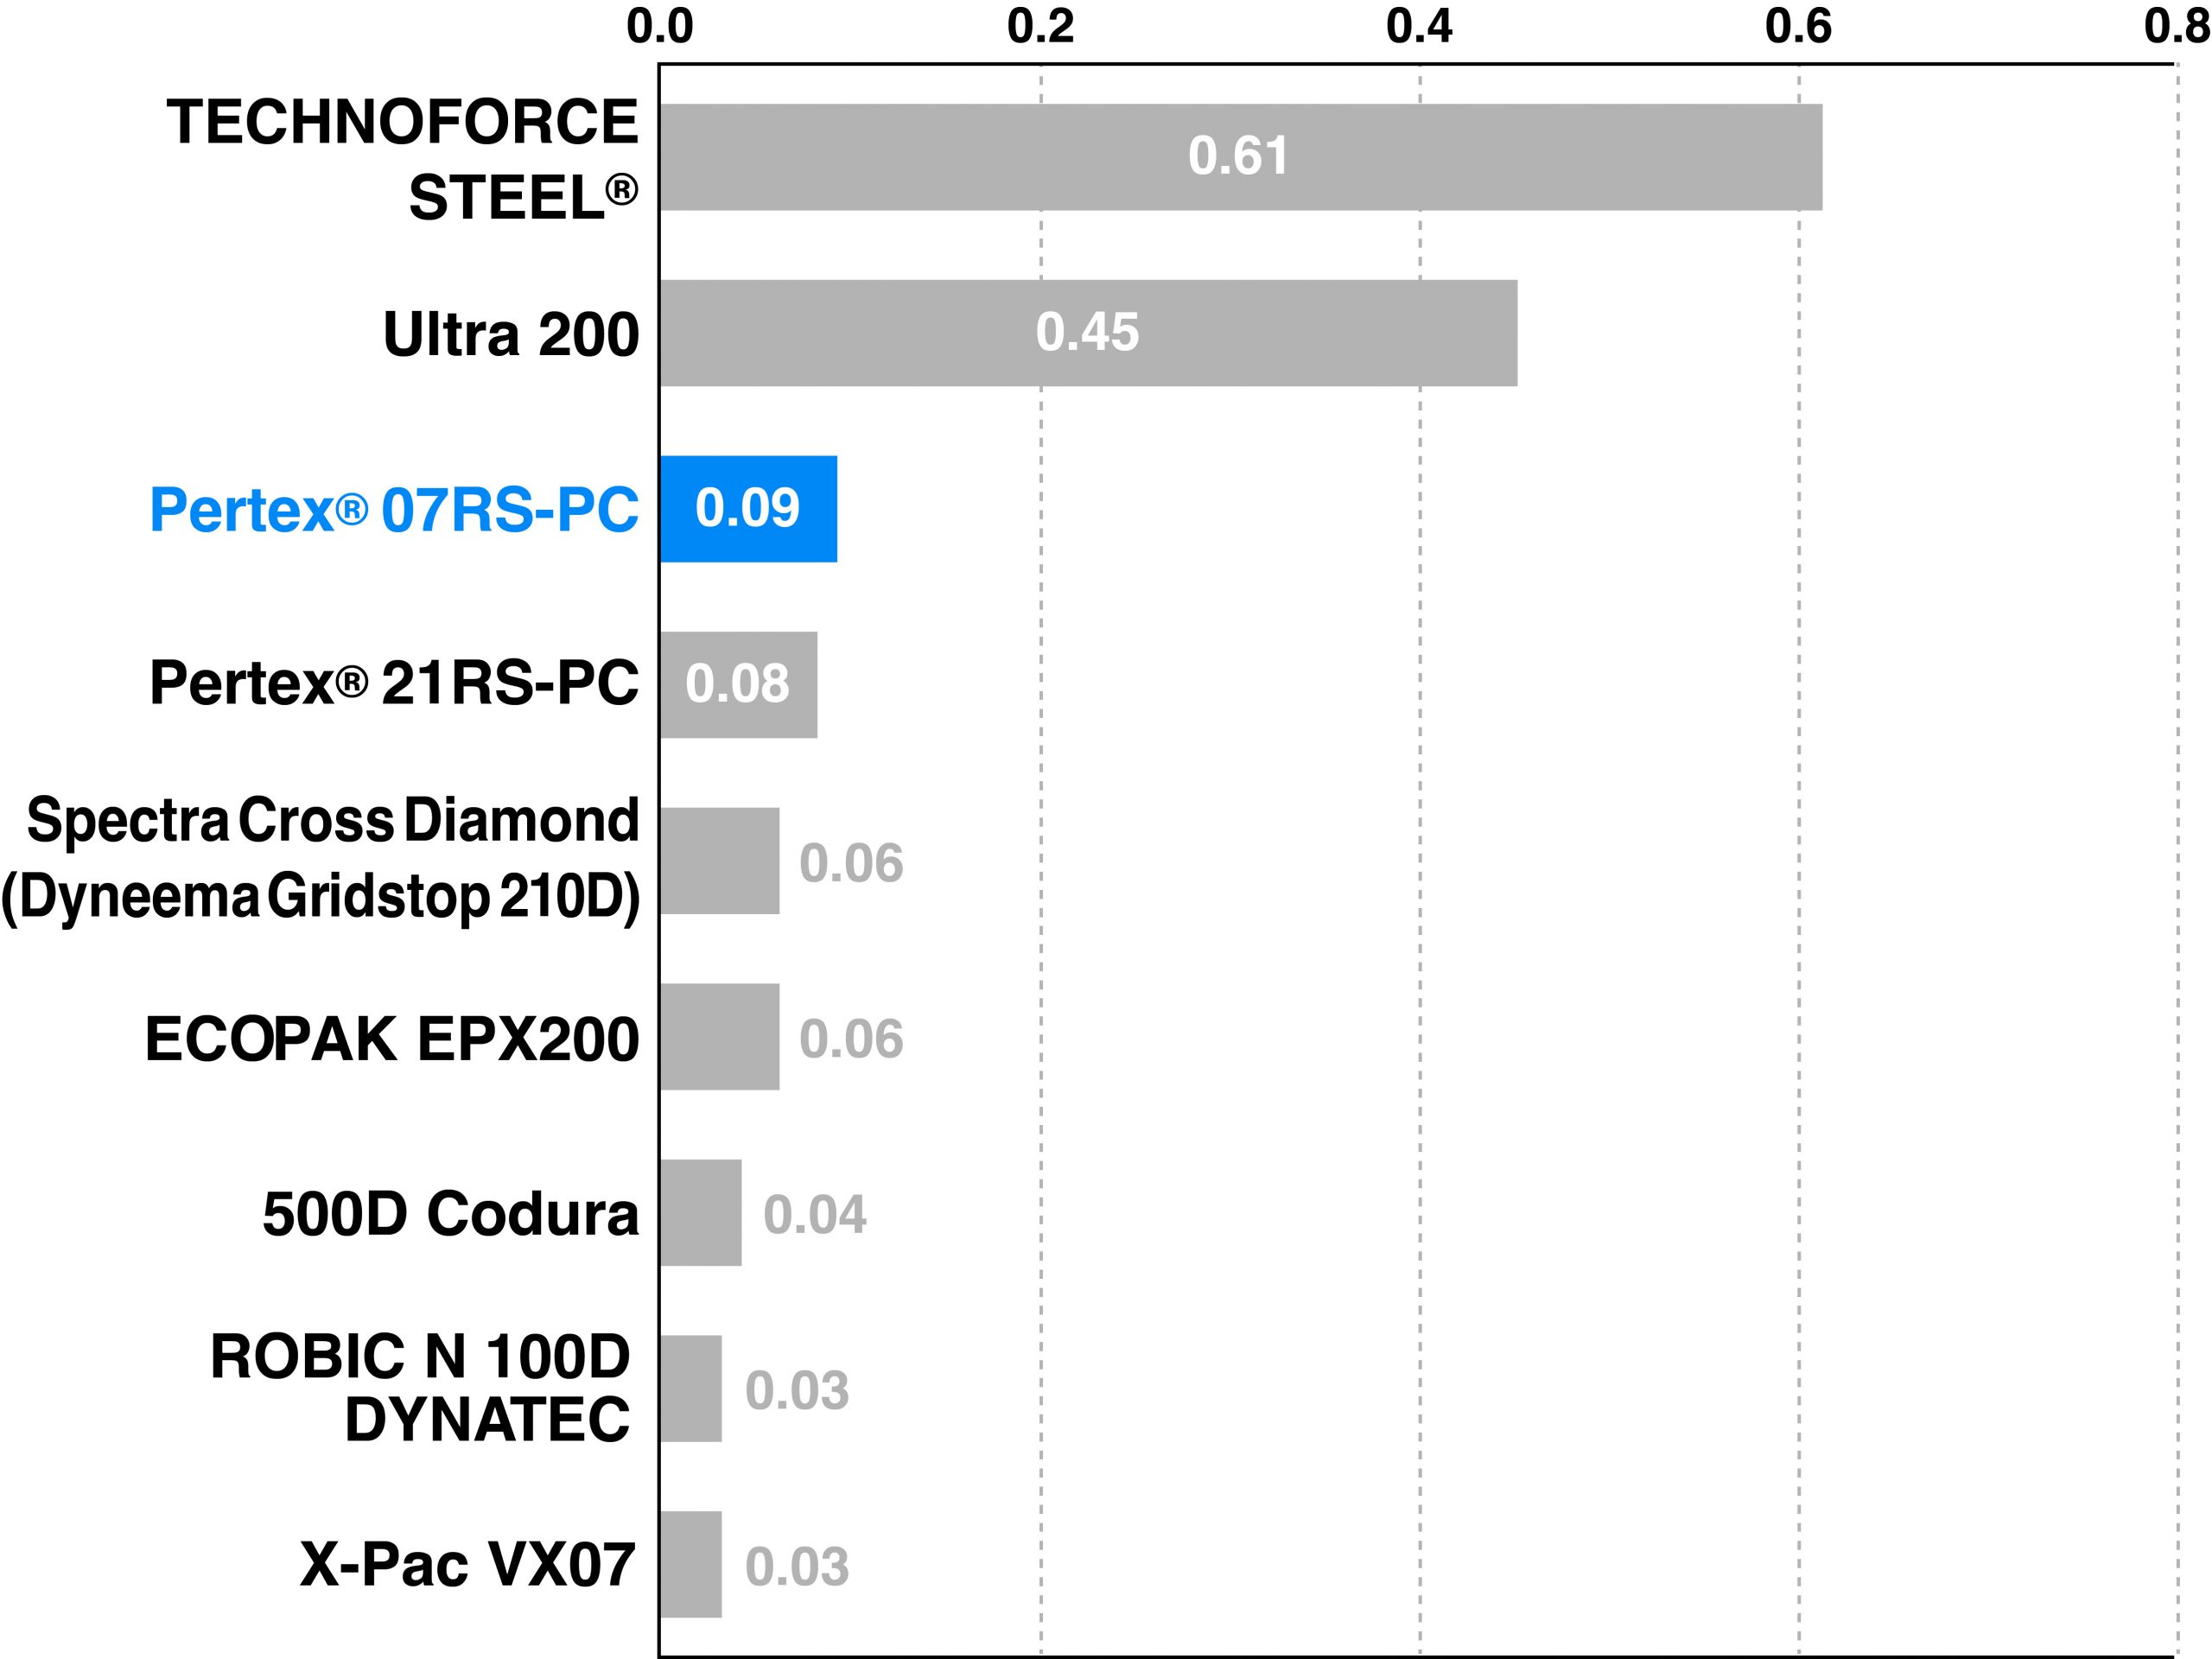
Why Nylon 6—and Its Unique Performance
Pertex has worked primarily with nylon 6 since its founding, building a deep understanding of the material’s characteristics. While they do use nylon 66 when the application demands it, their fabric development is always based on selecting the right material for the intended function.
Nylon 66 is typically known for its high strength and abrasion resistance, but it tends to be stiff and more prone to sudden failure under stress. Nylon 6, by contrast, offers greater flexibility and can stretch slightly under load, allowing it to disperse impact more effectively. For this project, we chose to embrace the natural suppleness of nylon 6 and designed a fabric that is both lightweight and exceptionally strong.
A Balanced Weave Structure for Durability
To take full advantage of nylon 6’s flexibility, we carefully considered the fabric’s weave. While tighter weaves typically yield higher strength, they can also become overly rigid and more prone to tearing under localized stress. Instead, we adopted a slightly looser “open” weave structure that allows the fabric to better absorb and distribute force.
We also used the same denier of nylon 6 yarn for both the vertical and horizontal threads, giving the fabric consistent strength in both directions. This uniformity helps distribute pressure evenly across the surface and prevents stress from concentrating in a single area.
A Coating Designed to Last
Most nylon backpack fabrics use polyurethane (PU) coatings to improve water resistance and durability. But PU is prone to breaking down over time, especially with exposure to moisture and sunlight, often resulting in peeling or stickiness.
To overcome this, we used a polycarbonate coating—a tougher, longer-lasting option also found in car interiors, architectural panels, and industrial protective gear. It’s far more resistant to UV and humidity, making it a great fit for long-term outdoor use. That said, polycarbonate is more difficult to work with and more expensive than PU, which is why it’s still rarely used in textiles.
ECOPAK EPX200
The ECOPAK EPX2-00 is a multi-layered material consisting of 200 denier polyester and diamond-patterned blue polyester cross ply, combined with 70 denier ripstop on the back. It is made from 100% recycled polyester, offering excellent strength and waterproofing properties.

Size guide
| Size | M | L |
|---|---|---|
| Weight kg |
42~69 | 67~85 |
| Height cm |
150~175 | 170~190 |
| Back Length cm |
45~54 | 54~57 |
We offer two sizes of the MINI2. In general, we recommend the larger L size if you are over 175cm tall, but as all people are different we recommend you try out the two different sizes before you buy if at all possible.
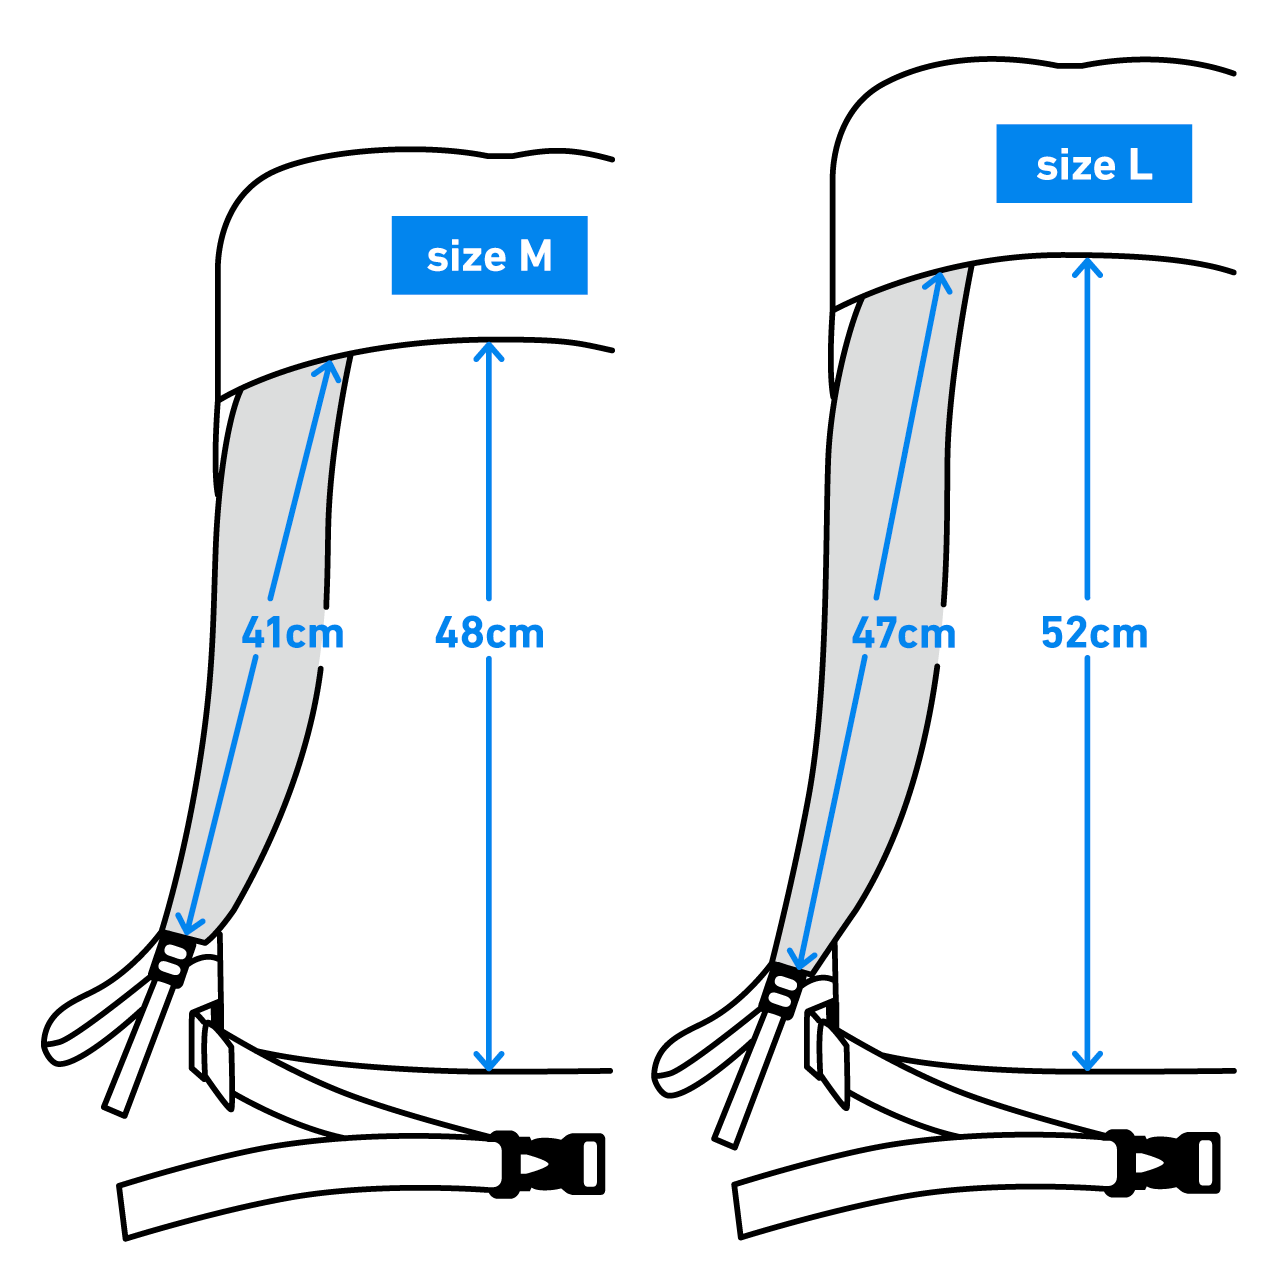
- The length of the shoulder strap is the straight line from the base of the strap to the end of the core material.
- Please refer to the ONE product page for more information on how we measure the length of the back of our backpacks.
- MINI2 made before 2018 are all size M.
Notes before use
Fabric Water Resistance
While the fabric used is highly water-resistant, the backpack is not waterproof. We recommend using a waterproof pack liner or a rain cover.
DEET
Insect repellents containing DEET can degrade the coating of the fabric components, so please do not let them come into contact with this product.
Instructions
Care Instructions
- Hand-wash only. Do not machine wash.
- Submerge the product in lukewarm water with a correct amount of neutral detergent, and hand-wash it.
- Do not bleach. Do not use fabric softener.
- Remove any optional parts such as pads before washing.
- Wash off any noticeable stains or smudges with a washing brush or soft sponge.
- Rinse well so that no detergent remains.
- Drain the backpack with the mouth down. Keep dry in a shade.
- Store in a dark, well-ventilated place.
- Do not iron.
- Hand-wash the pad gently, rinse well and keep dry in a shade.
Care Instructions Page
For detailed tips on how to wash, store, and take care of your gear, visit our Care Instructions page.
Payment
- We only accept payment by credit card. We currently do not accept payment via bank transfer from overseas accounts.
- We accept the following Credit Cards: Visa, Master, American Express, and JCB.
- To download your receipt, please click the link included in the Dispatch Notice, which we will send by email as soon as the items are dispatched.
- Bank transfer is only availble for those that own a Japanese bank account.
Delivery
- Order Confirmation will be sent after the order.
- The items will be dispatched within 3 days after the payment is confirmed.
- The dispatch notice will be sent by email as soon as the items are dispatched.
- The delivery may be delayed by unforeseeable reasons such as natural disasters and other logistics issues. We appreciate your patience and understanding.
- We cannot ship multiple orders in one package due to how our delivery system is currently set up.
- We will ship to regions in North America, Oceania, and Europe (excluding Russia) via DHL. For regions in Asia, the Middle East, Central and South America, Africa, and Russia, we use EMS (International Express Mail Service) for shipping.
- Shipping fees and delivery times vary depending on the shipping destination as well as the size and weight of the items.
Size Exchange
- Overseas customers who need to change the size of their order, should note that the time needed for shipping will vary greatly depending on your country of residence.
- We only accept exchanges when the item is unused (except for fitting).
- If you wish to exchange the size of the item, please contact us within seven days of receiving your order.
- Exchanges can only be made for the same color in a different size.
- If the size you wish is out of stock, we will suggest a different color.
- If the product is out of stock, we may simply have to ship the item back to you.
- All shipping costs to be carried by the customer.
- We will only send the exchanged item to you, upon receipt of return shipping cost via PayPal.
- Please be aware that some countries charge customs duties depending on the price of the item.
- We are unable to answer any questions on local customs. Please contact your local customs bureau.
Repair
We accept repairs for all of our Yamatomichi products. For inquiries on repair services including patching the holes, repairing with extra components, or fixing the items damaged over time, please feel free to contact us from the “Repair” section of the SUPPORT page.
Repair Tape
- For temporary repair, please keep the repair tape in your emergency kit.
- The repair tape should be patched up on both the front and back sides of the fabric. The tape must be larger than the damaged or torn part of the fabric.
- If you round the edges of the patch, it will last longer.